Currently,
I’m using the Radscheduler MultiDayView to create a “two week” view in which
the end user has the possibility to choose if he wants to see weekend days or
not.
When this
view is used in combination with appointments spanning multiple days and the display
of the weekend days, every thing works fine (with_weekend.png). The appointment
starts at 06/21/19 05:00 and ends 06/24/19 21:05.
However, if
weekend days are not shown in this view (without_weekend.png), part of the same
appointment is shown on 06/25/19 and the end time on 06/24/19 is also incorrect.
How can I solve this? It is not an option to show it as an “All day appointment” since the customer wants to know the exact start and end time.
The provided sample project is greatly appreciated. I was able to replicate the incorrect appointment rendering when the appointment occupies days that are excluded from the added intervals no matter if they are weekends or during the week. Here is the sample code that replicates the incorrect result:
public RadForm1(){ InitializeComponent(); this.radScheduler1.ActiveViewType = SchedulerViewType.MultiDay; Appointment a = new Appointment(new DateTime(2019, 6, 21, 5, 0, 0), new DateTime(2019, 6, 24, 21, 05, 0), "Test"); a.AllDay = false; this.radScheduler1.Appointments.Add(a); int daysDuration = 2; SchedulerMultiDayView multiDayView = new SchedulerMultiDayView(); multiDayView.ShowAllDayArea = false; DateTime startDate = new DateTime(2019, 6, 20); multiDayView.Intervals.Add(startDate, daysDuration); multiDayView.Intervals.Add(startDate.AddDays(4), daysDuration * 2); this.radScheduler1.ActiveView = multiDayView;}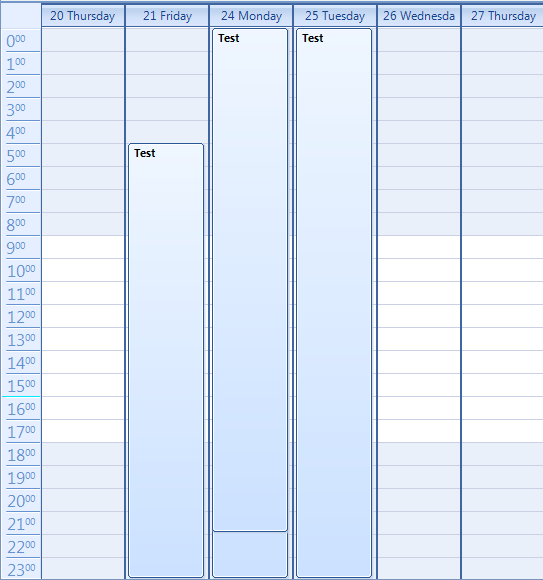
The above screenshot shows how the two days that are excluded are rendered on the view and overlap with the valid appointment days.
I have logged it in our feedback portal by making this thread public. You can track its progress, subscribe for status changes and add your comments on the following link - feedback item.
I have also updated your Telerik points.
Currently, the possible solution that I can suggest is to handle the AppointmentFormatting event and hide the visual AppointmentElements which interval is not included into the view:
SchedulerMultiDayView multiDayView = new SchedulerMultiDayView(); public RadForm1(){ InitializeComponent(); new RadControlSpyForm().Show(); this.radScheduler1.AppointmentFormatting += radScheduler1_AppointmentFormatting; this.radScheduler1.ActiveViewType = SchedulerViewType.MultiDay; Appointment a = new Appointment(new DateTime(2019, 6, 21, 5, 0, 0), new DateTime(2019, 6, 24, 21, 05, 0), "Test"); a.AllDay = false; this.radScheduler1.Appointments.Add(a); int daysDuration = 2; multiDayView.ShowAllDayArea = false; DateTime startDate = new DateTime(2019, 6, 20); multiDayView.Intervals.Add(startDate, daysDuration); multiDayView.Intervals.Add(startDate.AddDays(4), daysDuration * 2); this.radScheduler1.ActiveView = multiDayView;} private void radScheduler1_AppointmentFormatting(object sender, SchedulerAppointmentEventArgs e){ e.AppointmentElement.Visibility = ElementVisibility.Collapsed; foreach (DateTimeInterval interval in multiDayView.Intervals) { if (interval.Contains(e.AppointmentElement.Start) && interval.Contains(e.AppointmentElement.End)) { e.AppointmentElement.Visibility = ElementVisibility.Visible; break; } }}The attached gif file illustrates the achieved result.
I hope this helps. Should you have further questions please let me know.
Regards,
Dess | Tech Support Engineer, Sr.
Progress Telerik
Hello Dess,
I have modified the sample project. If you run it now, you will see that unticking the “Show Weekend” in the RadSchedulerNavigator will make the appointment visually last until Wednesday 26th.
To achieve this behaviour, I subscribed to the ShowWeekendStateChanged event of the RadSchedulerNavigator. I have written some specific code in adSchedulerNavigator1_ShowWeekendStateChanged to be able to have the option to show/hide the weekend in MultiDayView.
I hope this code is useful for you.
Indeed, the illustrated result doesn't seem to be correct. I have prepared a sample project that uses a SchedulerMultiDayView for its RadScheduler containing a single appointment with the specified days.
Note that the ShowWeekend property is available for SchedulerWeekView and SchedulerMonthView. But according to the description, you use SchedulerMultiDayView. It doesn't offer hiding the weekend. Could you please specify how exactly you eliminated the weekends in the SchedulerMultiDayView?

I have attached my sample project. Feel free to modify it in a way to reproduce the experienced issue and get back to me with it so I can investigate the precise case. Thank you in advance. I am converting this forum thread into a support ticket in order to allow attachments. You can find the ticket in Your Telerik Account.
I am looking forward to your reply.
Regards,
Dess | Tech Support Engineer, Sr.
Progress Telerik
- All
- Completed (5962)
- Declined (549)
- Duplicated (41)
- In Development (7)
- Need More Info (2)
- Planned (4)
- Unplanned (1838)
- All
- UI for WinForms
- AI Coding Assistant
- AIPrompt
- ApplicationMenu
- AutoCompleteBox
- Barcode (Obsolete)
- BarcodeView
- BindingNavigator
- BreadCrumb
- BrowseEditor
- Buttons
- ButtonTextBox
- Calculator
- CalculatorDropDown
- Calendar
- Callout
- CardView
- Carousel
- ChartView
- Chat
- CheckedDropDownList
- CheckedListBox
- CollapsiblePanel
- ColorBox
- ColorDialog
- CommandBar
- ContextMenu
- DataEntry
- DataFilter
- DataLayout
- DateOnlyPicker
- DateTimePicker
- DesktopAlert
- Diagram, DiagramRibbonBar, DiagramToolBox
- Dock
- DomainUpDown
- DropDownList
- Editors
- FileDialogs
- FilterView
- Flyout
- FontDropDownList
- Form
- Forms/Dialogs/Templates
- GanttView
- GridView
- GroupBox
- HeatMap
- ImageEditor
- Installer and VS Extensions
- Label
- LayoutControl
- Licensing
- ListControl
- ListView
- Map
- MaskedEditBox
- Menu
- MessageBox
- MultiColumnCombo
- NavigationView
- NotifyIcon
- OfficeNavigationBar
- Overlay
- PageView
- Panel
- Panorama
- PdfViewer
- PictureBox
- PipsPager
- PivotGrid
- PopupEditor
- ProgressBar
- PropertyGrid
- RadialGauge, LinearGauge, BulletGraph
- RangeSelector
- Rating
- RibbonBar
- RibbonForm
- RichTextEditor
- Rotator
- Scheduler/Reminder
- ScrollablePanel
- ScrollBar
- Separator
- ShapedForm
- SlideView
- SparkLine
- SpeechToTextButton
- SpellChecker
- SpinEditor
- SplashScreen
- SplitContainer
- Spreadsheet
- StatusStrip
- StepProgressBar
- SyntaxEditor
- TabbedForm
- TaskbarButton
- TaskBoard
- TaskDialog
- TextBox
- TextBoxControl
- TimeOnlyPicker
- TimePicker
- TimeSpanPicker
- TitleBar
- ToastNotificationManager
- ToolbarForm
- Tools for WinForms: Visual Style Builder, Control Spy, Shape Editor, Element Hierarchy Editor
- TrackBar
- TreeMap
- TreeView
- UI Framework
- ValidationProvider
- VirtualGrid
- VirtualKeyboard
- WaitingBar
- WebCam
- Wizard