The arrow button click does not work as expected in the latest release version. This is a regression in our latest 2026.2.702 release, where the AllowedClickButtons property is not initialized correctly. We are working on a fix! Please subscribe to this item, and you will receive an email notification when we introduce the fix.
In the meantime, you can apply the following workaround:
this.radDropDownList1.DropDownListElement.ArrowButton.AllowedClickButtons = MouseButtons.Left;Or use v.2026.2.520, where the arrow button functions as usual.
We appreciate your patience and apologize for the inconvenience this issue may have caused.
Clients with perpetual license may observe the following warning when using UI.for.WinForms.AllControls.Net90 (v.2026.1.415):
Telerik and Kendo UI Licensing warning TKL403: Services associated with Telerik Document Processing Libraries version 2026.1.402.80 require a subscription or trial license. Please obtain a subscription license at https://prgress.co/3PwQMKZ
Telerik and Kendo UI Licensing warning TKL004: Unable to locate licenses for all products.
When an appointment has a very short duration (seconds-level, e.g., 1 second and 0 minutes), it does not appear in the RadPrintPreviewDialog. The appointment is visible in the scheduler UI but missing from the print preview.
For example:
Dim ap1 As New Appointmentap1.Start = New Date(Date.Today.Year, Date.Today.Month, Date.Today.Day, 15, 0, 0)
ap1.End = New Date(Date.Today.Year, Date.Today.Month, Date.Today.Day, 15, 0, 1)
ap1.Description = "not printed"
ap1.Summary = "not printed"
RadScheduler1.Appointments.Add(ap1)
To reproduce:

    Sub New()

        InitializeComponent()

        Dim intItem As New PropertyStoreItem(GetType(Integer), "Integer", 1)
        Dim floatItem As New PropertyStoreItem(GetType(Single), "Float", 1.0F, "Property storing a floating point value.")
        Dim stringItem As New PropertyStoreItem(GetType(String), "String", "telerik", "Property storing a string value", "Telerik")
        Dim fontItem As New PropertyStoreItem(GetType(Font), "Font", New Font("Arial", 12, FontStyle.Italic), "Property containing Font value")

        fontItem.Attributes.Add(New ReadOnlyAttribute(True))
        floatItem.Attributes.Add(New ReadOnlyAttribute(True))
        Dim store As New RadPropertyStore
        store.Add(intItem)
        store.Add(floatItem)
        store.Add(stringItem)
        store.Add(fontItem)
        Me.RadPropertyGrid1.SelectedObject = store
    End Sub

Try to edit either the "Float" or the "Font" property. The editor will be activated although it doesn't have to.

Workaround: cancel the Editing event

    Private Sub RadPropertyGrid1_Editing(sender As Object, e As PropertyGridItemEditingEventArgs)
        If e.Item.Name = "Font" Then
            e.Cancel = True
        End If
    End Sub
An exception is thrown when loading a document:
FileNotFoundException: Could not load file or assembly 'Microsoft.Web.WebView2.WinForms, Version=1.0.3719.77, Culture=neutral, PublicKeyToken=2a8ab48044d2601e' or one of its dependencies. The system cannot find the file specified.
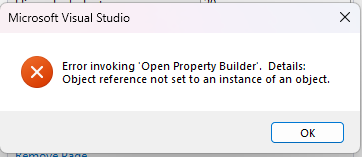
The following error occurs when closing Property Builder at design time:
Excel-like pop-up location is not scaled properly on High DPI.

Use attached to reproduce.
Workaround:
The vsdiffmerge.exe merge tool in Visual Studio 2017 is usually located here: C:\Program Files (x86)\Microsoft Visual Studio\2017\Professional\Common7\IDE\CommonExtensions\Microsoft\TeamFoundation\Team Explorer. You will need to create one additional folder named Ide inside the Team Explorer folder Then you can copy the vsdiffmerge.exe file from the Team Explorer folder to the newly created Ide folder. You can check the attached vsdiffmerge-path.png screenshot.

Then you can create the environment variable like this:
Variable name: VS120COMNTOOLS
Path: C:\Program Files (x86)\Microsoft Visual Studio\2017\Professional\Common7\IDE\CommonExtensions\Microsoft\TeamFoundation\Team Explorer\IDE
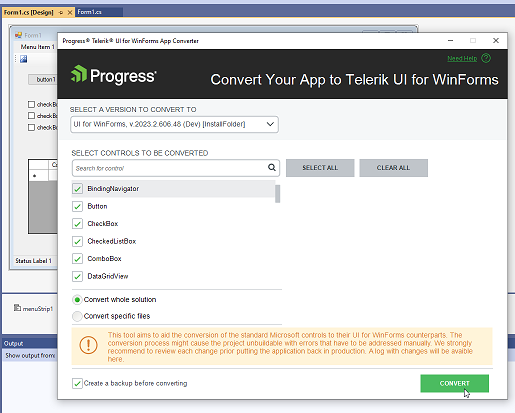
Hi, I would like to use the conversion tool to convert a WinForms project to Telerik controls. Unfortunately the menu item is not showing up for me. See attached screenshot.
The project to be converted does include a reference to System.Windows.Forms. I am using VS2019 with the latest Telerik Winforms release.
Thanks,
-Lou
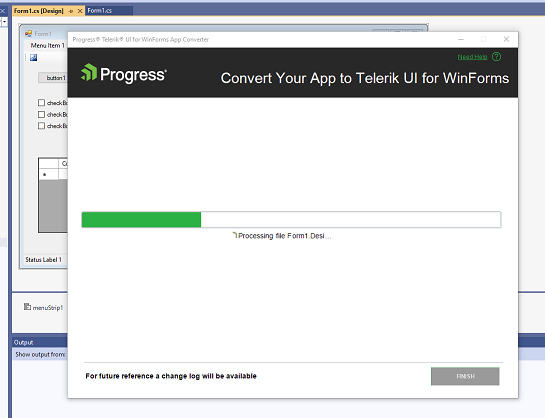
After a project, built with the standard MS controls, is successfully converted to a Telerik WinForms project, the subscriptions to certain events available in the Designer.cs file may disappear if you open the design view and make some changes. A solution for this behavior is described in the How to Deal with Disappearing Event Handlers after Opening the Designer for a Converted WinForms Project KB Article.
VS 2022 17.5.1 successfully converts a blank WinForms project without any Telerik control in it.
VS 2022 17.6.2 hangs:

The AccessibleName property is not respected by the Windows Narrator.
Other controls that have the same behavior:
- RadMaskedEditBox
Use the following code snippet:
    Sub New()
        InitializeComponent()
        Me.RadCheckedDropDownList1.ShowCheckAllItems = True
        Me.RadCheckedDropDownList1.AutoSizeItems = True
        For x = 1 To 20
            Dim i As New DescriptionTextCheckedListDataItem
            i.Value = x
            i.Text = x.ToString()
            i.DescriptionText = "abc def ghijkl mnop abc def ghijkl mnop" & x
            Me.RadCheckedDropDownList1.Items.Add(i)
        Next
    End Sub
Open the popup, scroll to the bottom and then back to the top.
Expected: The CheckAllItem is visible
Actual: The CheckAllItem is hidden