Unplanned
Last Updated:
04 Oct 2016 08:13
by ADMIN
ADMIN
Created by:
Dess | Tech Support Engineer, Principal
Comments:
0
Category:
Scheduler/Reminder
Type:
Bug Report
To reproduce:

public Form1()
{
    InitializeComponent();
    this.radScheduler1.ActiveViewType = SchedulerViewType.Week;
    SchedulerWeekView weekView = this.radScheduler1.GetWeekView();
    weekView.RangeFactor = ScaleRange.QuarterHour;

    Appointment appointment = new Appointment(DateTime.Today.AddHours(23).AddMinutes(45), new TimeSpan(0,15,0), "Meeting");
    DailyRecurrenceRule rrule = new DailyRecurrenceRule(appointment.Start, 1, 10);
    appointment.RecurrenceRule = rrule;
    this.radScheduler1.Appointments.Add(appointment);
}

Workaround: In order to deal with the border case with appointment ending at 00:00h, use a new TimeSpan(0,14,59)
Unplanned
Last Updated:
21 Nov 2016 12:38
by ADMIN
ADMIN
Created by:
Dess | Tech Support Engineer, Principal
Comments:
0
Category:
Scheduler/Reminder
Type:
Bug Report
To reproduce: use the following code

Sub New()

    InitializeComponent()

    AddHandler Me.RadScheduler1.ActiveViewChanged, AddressOf ActiveViewChanged
    Me.RadScheduler1.ActiveViewType = Telerik.WinControls.UI.SchedulerViewType.Week
End Sub

Private Sub ActiveViewChanged(sender As Object, e As Telerik.WinControls.UI.SchedulerViewChangedEventArgs)
    Dim dayView As SchedulerDayViewBase = TryCast(Me.RadScheduler1.ActiveView, SchedulerDayViewBase)
    Dim dayViewElement As SchedulerDayViewElement = TryCast(Me.RadScheduler1.SchedulerElement.ViewElement, SchedulerDayViewElement)
    If dayViewElement IsNot Nothing Then
        Dim ruler As RulerPrimitive = dayViewElement.DataAreaElement.Ruler
        ruler.StartScale = 6
        ruler.EndScale = 22
        dayView.WorkTime = New TimeInterval(TimeSpan.FromHours(13), TimeSpan.FromHours(16))

    End If
End Sub

When you run the project you will notice that the work time starts from 19:00 to 22:00. When you switch between DayView and WeekView, the ruler is not aligned with the scheduler cells as well. The attached gif file illustrates the incorrect behavior.

Workaround: use the RulerStartScale and RulerEndScale of the SchedulerDayViewBase

 Sub New()

     InitializeComponent()

     AddHandler Me.RadScheduler1.ActiveViewChanged, AddressOf ActiveViewChanged
     Me.RadScheduler1.ActiveViewType = Telerik.WinControls.UI.SchedulerViewType.Week
 End Sub

 Private Sub ActiveViewChanged(sender As Object, e As Telerik.WinControls.UI.SchedulerViewChangedEventArgs)
     Dim dayView As SchedulerDayViewBase = TryCast(Me.RadScheduler1.ActiveView, SchedulerDayViewBase)
     If dayView IsNot Nothing Then
         dayView.RulerStartScale = 6
         dayView.RulerEndScale = 22
         dayView.WorkTime = New TimeInterval(TimeSpan.FromHours(13), TimeSpan.FromHours(16))
     End If
 End Sub
Unplanned
Last Updated:
27 Dec 2016 15:30
by ADMIN
ADMIN
Created by:
Dess | Tech Support Engineer, Principal
Comments:
0
Category:
Scheduler/Reminder
Type:
Bug Report
Please refer to the attached gif files. The separator ";" should be displayed when the appointment's information is displayed in a single line. Otherwise, the information should be displayed multi-line like in the OutlookSeparator.gif.

Note: you can test with different AppointmentTitleFormat.

Important: setting the Text in the AppointmentFormatting event must have higher priority than AppointmentTitleFormat!!!

Workaround:

Sub New()
    InitializeComponent()

    Me.RadScheduler1.ElementProvider = New MyElementProvider(Me.RadScheduler1)
    Me.RadScheduler1.Appointments.Add(New Appointment(DateTime.Now, TimeSpan.FromMinutes(40), "Summary", "Description", "Location"))
End Sub

Public Class CustomAppointmentElement
Inherits AppointmentElement
    Public Sub New(scheduler As RadScheduler, view As SchedulerView, appointment As IEvent)
        MyBase.New(scheduler, view, appointment)

    End Sub

    Protected Overrides Function CreateAppointmentText() As String
        Return String.Format("{0:HH:mm} - {1:HH:mm} {3} <b>{2}</b>", Me.Appointment.Start, Me.Appointment.End, _
                             Me.Appointment.Location, Me.Appointment.Summary)
    End Function
End Class

Public Class MyElementProvider
Inherits SchedulerElementProvider
    Public Sub New(scheduler As RadScheduler)
        MyBase.New(scheduler)
    End Sub
    Protected Overrides Function CreateElement(Of T As SchedulerVisualElement)(view As SchedulerView, context As Object) As T
        If GetType(T) = GetType(AppointmentElement) Then
            Return TryCast(New CustomAppointmentElement(Me.Scheduler, view, DirectCast(context, IEvent)), T)
        End If

        Return MyBase.CreateElement(Of T)(view, context)
    End Function
End Class
Unplanned
Last Updated:
19 Jun 2017 10:38
by ADMIN
ADMIN
Created by:
Dess | Tech Support Engineer, Principal
Comments:
0
Category:
Scheduler/Reminder
Type:
Bug Report
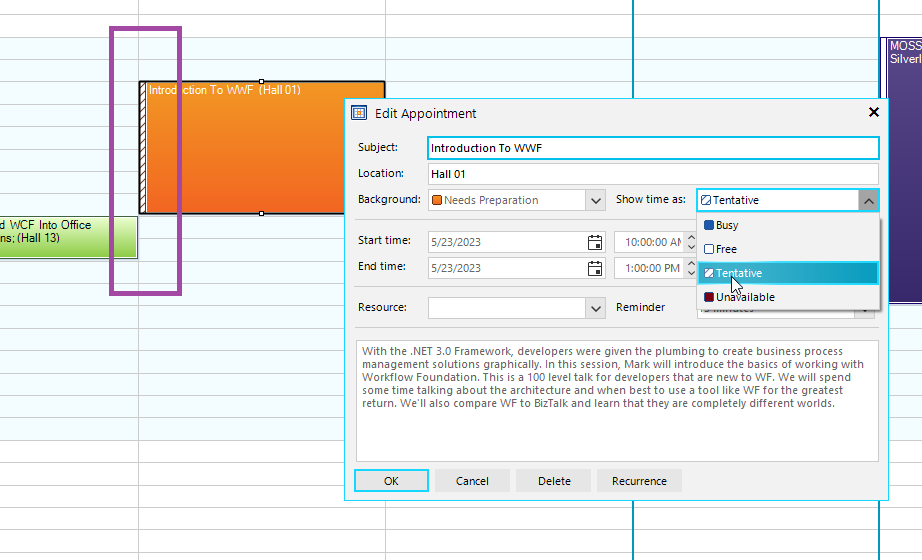
Workaround: create a derivative of the EditAppointmentDialog. Open the designer and adjust the form's height and button's position. Then replace the default dialog with the custom one:

public RadForm1()
{
    InitializeComponent();
    this.radScheduler1.AppointmentEditDialogShowing += radScheduler1_AppointmentEditDialogShowing;
}
CustomEditAppointmentDialog dialog;
private void radScheduler1_AppointmentEditDialogShowing(object sender, Telerik.WinControls.UI.AppointmentEditDialogShowingEventArgs e)
{
    if (dialog==null)
    {
        dialog = new CustomEditAppointmentDialog();
    }
    e.AppointmentEditDialog = dialog;
}
Unplanned
Last Updated:
17 Apr 2024 14:30
by ADMIN
ADMIN
Created by:
Dess | Tech Support Engineer, Principal
Comments:
2
Category:
Scheduler/Reminder
Type:
Bug Report
To reproduce: please run the attached sample project and have a look at the gif file.

Workaround: in the _HideWeekDays method, don't pass 0 width as a parameter in the SetColumnWidth method. Use 0.01 instead.
Unplanned
Last Updated:
19 Jun 2017 11:14
by ADMIN
ADMIN
Created by:
Dess | Tech Support Engineer, Principal
Comments:
0
Category:
Scheduler/Reminder
Type:
Bug Report
To reproduce:

Appointment a1 = new Appointment(DateTime.Today.AddHours(10).AddMinutes(30), TimeSpan.FromMinutes(30), "A1");
Appointment a2 = new Appointment(DateTime.Today.AddHours(11) , TimeSpan.FromMinutes(30), "A2");
Appointment a3 = new Appointment(DateTime.Today.AddHours(11).AddMinutes(30), TimeSpan.FromMinutes(30), "A3");
this.radScheduler1.Appointments.Add(a1);
this.radScheduler1.Appointments.Add(a2);
this.radScheduler1.Appointments.Add(a3);
this.radScheduler1.ActiveViewType = SchedulerViewType.Timeline;
SchedulerTimelineView timelineView = radScheduler1.GetTimelineView();
timelineView.ShowTimescale(Timescales.Minutes);
timelineView.GetScaling().DisplayedCellsCount = 10;

Please refer to the attached sample project which incorrect behavior when scrolling is illustrated in the attached gif file.

Workaround: instead of specifying 30 minutes duration of an appointment, use 29 minutes and 59 seconds.
Unplanned
Last Updated:
14 Aug 2017 11:52
by ADMIN
ADMIN
Created by:
Dess | Tech Support Engineer, Principal
Comments:
0
Category:
Scheduler/Reminder
Type:
Bug Report
To reproduce: please refer to the attached sample project and run it. Try to edit the existing appointment by using the inline editor. As a result, the AppointmentAdded event will be fired. You will notice that the Appointments collection contains more appointments than the existing ones. Note that if you use the edit dialog, this event is not fired and the behavior is as expected.

Workaround: RadScheduler1.SchedulerElement.EditorManager.EditorViewMode = SchedulerEditorViewMode.EditorDialog
Unplanned
Last Updated:
14 Aug 2017 11:54
by ADMIN
ADMIN
Created by:
Dess | Tech Support Engineer, Principal
Comments:
0
Category:
Scheduler/Reminder
Type:
Bug Report
To reproduce: Use the following code snippet:

            DateTime dt = DateTime.Now;
            this.radScheduler1.Appointments.Add(new Appointment(dt, TimeSpan.FromHours(4),"A1"));
            this.radScheduler1.Appointments.Add(new Appointment(dt, TimeSpan.FromHours(4),"A2"));

By default, when two appointments start at the same time, on the left side it is displayed the shorter appointment. Hence, if you start resizing an appointment it may jump to another location leaving the mouse in a  wrong and inconsistent position.  The attached gif illustartes the behavior.

Workaround:

public RadForm1()
{
    InitializeComponent();

    this.radScheduler1.ElementProvider = new MyElementProvider(this.radScheduler1);

    DateTime dt = DateTime.Now;
    this.radScheduler1.Appointments.Add(new Appointment(dt, TimeSpan.FromHours(4),"A1"));
    this.radScheduler1.Appointments.Add(new Appointment(dt, TimeSpan.FromHours(4),"A2"));
}

private class AppointmentDateInfo : IComparable
{
    public AppointmentElement appointment;
    public DateTime date;
    public bool isEnd;
    private DateTimeComparer comparer;

    public AppointmentDateInfo(AppointmentElement appointment, DateTime date, bool isEnd)
    {
        this.comparer = new DateTimeComparer(appointment.Scheduler);
        this.appointment = appointment;
        this.date = date;
        this.isEnd = isEnd;
    }

    public int CompareTo(object obj)
    {
        AppointmentDateInfo other = obj as AppointmentDateInfo;
        if (other == null)
        {
            return 1;
        }

        int res = date.CompareTo(other.date);
        if (res == 0)
        {
            if (other.appointment != this.appointment)
            {
                res = other.isEnd.CompareTo(isEnd);
            }
            else
            {
                res = this.isEnd.CompareTo(other.isEnd);
            }
        }
        if (appointment.Start.Equals(other.appointment.Start))
        {
            return res != 0 ? res : appointment.AppointmentSubject.CompareTo(other.appointment.AppointmentSubject);
        }
        return res != 0 ? res : comparer.Compare(appointment, other.appointment);
    }
}

public class MyElementProvider : SchedulerElementProvider
{
    public MyElementProvider(RadScheduler scheduler) : base(scheduler)
    {
    }

    protected override T CreateElement<T>(SchedulerView view, object context)
    {
        if (typeof(T) == typeof(DayViewAppointmentsTable))
        {
            return new CustomDayViewAppointmentsTable(this.Scheduler, view, (DayViewAppointmentsArea)context)as T;
        }

        return base.CreateElement<T>(view, context);
    }
}

public class CustomDayViewAppointmentsTable : DayViewAppointmentsTable
{
    public CustomDayViewAppointmentsTable(RadScheduler scheduler, SchedulerView view, DayViewAppointmentsArea area) : base(scheduler, view, area)
    {
    }

    private int FindLaneSpan(AppointmentElement appointment, Dictionary<AppointmentElement, int> appointmentLanes, int maxLanes)
    {
        int lane = appointmentLanes[appointment];
        int span = maxLanes - lane;

        int cellsPerHour = this.GetDayViewBase().GetNumberOfCellsPerHour();
        int minutesPerSlot = 60 / cellsPerHour;

        DateTime roundedAppStart = this.GetRulerRoundedDateTime(appointment.Start, false);
        DateTime roundedAppEnd = this.GetRulerRoundedDateTime(appointment.End, true);

        if (appointment.Start == appointment.End)
        {
            roundedAppEnd = roundedAppEnd.AddMinutes(minutesPerSlot);
        }

        foreach (KeyValuePair<AppointmentElement, int> item in appointmentLanes)
        {
            if (appointment == item.Key)
            {
                continue;
            }

            DateTime roundedItemStart = this.GetRulerRoundedDateTime(item.Key.Start, false);
            DateTime roundedItemEnd = this.GetRulerRoundedDateTime(item.Key.End, true);

            if (item.Key.Start == item.Key.End)
            {
                roundedItemEnd = roundedItemEnd.AddMinutes(minutesPerSlot);
            }

            if (roundedItemStart < roundedAppEnd && roundedItemEnd > roundedAppStart && item.Value > lane)
            {
                span = Math.Min(span, item.Value - lane);
            }
        }

        return span;
    }

    private int FindFreeLane(List<AppointmentElement> overlappingAppointments, Dictionary<AppointmentElement, int> appointmentLanes)
    {
        List<int> indexes = new List<int>();

        for (int i = 0; i < overlappingAppointments.Count; i++)
        {
            indexes.Add(appointmentLanes[overlappingAppointments[i]]);
        }

        indexes.Sort();

        for (int i = 0; i < indexes.Count; i++)
        {
            if (i < indexes[i])
            {
                return i;
            }
        }

        return overlappingAppointments.Count;
    }

    protected override void ArrangeAppointments(SizeF finalSize)
    {
        RectangleF containerRect = new RectangleF(PointF.Empty, finalSize);
        List<AppointmentElement> appointmentsInLayout = new List<AppointmentElement>();

        foreach (AppointmentElement element in this.AppointmentElements)
        {
            if (element.Visibility != ElementVisibility.Collapsed)
            {
                appointmentsInLayout.Add(element);
            }
        }

        appointmentsInLayout.Sort(new DateTimeComparer(this.Scheduler));
        Dictionary<AppointmentElement, object> arrangedAppointments = new Dictionary<AppointmentElement, object>();

        foreach (AppointmentElement appointmentElement in appointmentsInLayout)
        {
            if (arrangedAppointments.ContainsKey(appointmentElement))
            {
                continue;
            }

            appointmentElement.RelatedAppointments.Sort(new DateTimeComparer(this.Scheduler));

            List<AppointmentDateInfo> appointmentDates = new List<AppointmentDateInfo>();
            List<AppointmentElement> overlappingAppointments = new List<AppointmentElement>();
            Dictionary<AppointmentElement, int> appointmentLanes = new Dictionary<AppointmentElement, int>();

            foreach (AppointmentElement relatedAppointment in appointmentElement.RelatedAppointments)
            {
                if (relatedAppointment.Visibility == ElementVisibility.Collapsed)
                {
                    continue;
                }

                DateTime appStart = relatedAppointment.Start <= relatedAppointment.End ? relatedAppointment.Start : relatedAppointment.End;
                DateTime appEnd = relatedAppointment.Start <= relatedAppointment.End ? relatedAppointment.End : relatedAppointment.Start;

                if (!this.Scheduler.EnableExactTimeRendering)
                {
                    if (appStart != appEnd)
                    {
                        appointmentDates.Add(new AppointmentDateInfo(relatedAppointment, this.GetRulerRoundedDateTime(appStart, false), false));
                        appointmentDates.Add(new AppointmentDateInfo(relatedAppointment, this.GetRulerRoundedDateTime(appEnd, true), true));
                    }
                    else
                    {
                        int cellsPerHour = this.GetDayViewBase().GetNumberOfCellsPerHour();
                        int minutesPerSlot = 60 / cellsPerHour;

                        appointmentDates.Add(new AppointmentDateInfo(relatedAppointment, this.GetRulerRoundedDateTime(appStart, false), false));
                        appointmentDates.Add(new AppointmentDateInfo(relatedAppointment, this.GetRulerRoundedDateTime(appEnd, true).AddMinutes(minutesPerSlot),
                            true));
                    }
                }
                else
                {
                    appointmentDates.Add(new AppointmentDateInfo(relatedAppointment, appStart, false));
                    appointmentDates.Add(new AppointmentDateInfo(relatedAppointment, appEnd, true));
                }
            }

            appointmentDates.Sort();
            int maxLanesCount = 0;

            for (int i = 0; i < appointmentDates.Count; i++)
            {
                if (!appointmentDates[i].isEnd)
                {
                    int freeLane = FindFreeLane(overlappingAppointments, appointmentLanes);
                    appointmentLanes.Add(appointmentDates[i].appointment, freeLane);
                    overlappingAppointments.Add(appointmentDates[i].appointment);
                    maxLanesCount = Math.Max(maxLanesCount, freeLane + 1);
                }
                else
                {
                    overlappingAppointments.Remove(appointmentDates[i].appointment);
                }

                if (overlappingAppointments.Count == 0)
                {
                    foreach (KeyValuePair<AppointmentElement, int> item in appointmentLanes)
                    {
                        AppointmentElement appointment = item.Key;
                        int lane = item.Value;
                        DateTime rulerRoundStart = this.GetRulerRoundedDateTime(appointment.Start, false);
                        DateTime rulerRoundEnd = this.GetRulerRoundedDateTime(appointment.End, true);

                        if (appointment.Start == appointment.End)
                        {
                            int cellsPerHour = this.GetDayViewBase().GetNumberOfCellsPerHour();
                            int minutesPerSlot = 60 / cellsPerHour;

                            rulerRoundEnd = rulerRoundEnd.AddMinutes(minutesPerSlot);
                        }

                        PointF location = GetItemLocationInTable(appointment.Start, finalSize);

                        float dayWidth = this.Area.DayViewElement.GetColumnWidth(this.Area.DayViewElement.GetColumnForDate(rulerRoundStart), finalSize.Width);
                        int laneSpan = FindLaneSpan(appointment, appointmentLanes, maxLanesCount);

                        SizeF size = new SizeF(dayWidth / maxLanesCount * laneSpan, this.GetItemHeight(appointment.Start, appointment.End));
                        location.X += dayWidth / maxLanesCount * lane + this.Area.DayViewElement.AppointmentMargin.Left;
                        location.Y += this.Area.DayViewElement.AppointmentMargin.Top;
                        size.Width -= this.Area.DayViewElement.AppointmentMargin.Horizontal;

                        appointment.DesiredBounds = this.OnAppointmentLayout(appointment, new RectangleF(location, size), finalSize);
                        if (!arrangedAppointments.ContainsKey(appointment))
                        {
                            arrangedAppointments.Add(appointment, null);
                        }
                    }

                    appointmentLanes.Clear();
                    maxLanesCount = 0;
                }
            }

            for (int i = 0; i < appointmentsInLayout.Count; i++)
            {
                AppointmentElement appointment = appointmentsInLayout[i];

                if (appointment.Visibility != ElementVisibility.Visible)
                    continue;

                RectangleF rectangle = appointment.DesiredBounds;

                if (this.RightToLeft)
                {
                    rectangle = LayoutUtils.RTLTranslateNonRelative(rectangle, containerRect);
                }

                appointment.Arrange(rectangle);
            }
        }
    }
}
Unplanned
Last Updated:
14 Aug 2017 11:55
by ADMIN
ADMIN
Created by:
Dess | Tech Support Engineer, Principal
Comments:
0
Category:
Scheduler/Reminder
Type:
Bug Report
Please refer to the attached sample project. When you toggle the button the Visible property for the first resource is inverted. However, it doesn't take effect in RadScheduler and the resource is always visible.

Workaround: Currently, if you want to hide some of the resources, you should remove them from the Resources collection of RadScheduler. When you want to use them again, you should just add them to the same collection.
Unplanned
Last Updated:
14 Aug 2017 12:00
by ADMIN
ADMIN
Created by:
Dess | Tech Support Engineer, Principal
Comments:
0
Category:
Scheduler/Reminder
Type:
Bug Report
Please refer to the attached sample project and screenshot. Note that if RadScheduler is not grouped by resources, the scrollbar works as expected.
Unplanned
Last Updated:
19 Jan 2018 13:27
by ADMIN
ADMIN
Created by:
Dess | Tech Support Engineer, Principal
Comments:
0
Category:
Scheduler/Reminder
Type:
Feature Request
To reproduce:

1. Add a RadScheduler and associate a RadSchedulerNavigator to it.
2. Change the culture to  "fa-IR". When running the application you will notice that the time range in the navigator is not displayed correctly considering the culture of the associate RadScheduler.

Note: you can set the SchedulerNavigatorElement.DateFormat property to  "dd dddd". Thus, the time range should be displayed in a similar way as the header cells in RadScheduler.

Workaround: you can controls what to be displayed in the navigator by the SchedulerNavigatorElement.DateLabel.Text property.

            this.radScheduler1.Culture = new System.Globalization.CultureInfo("fa-IR");

            string start = this.radScheduler1.ActiveView.StartDate.ToString(this.radSchedulerNavigator1.SchedulerNavigatorElement.DateFormat, this.radScheduler1.Culture);
            string end = this.radScheduler1.ActiveView.EndDate.ToString(this.radSchedulerNavigator1.SchedulerNavigatorElement.DateFormat, this.radScheduler1.Culture);
            this.radSchedulerNavigator1.SchedulerNavigatorElement.DateLabel.Text = start + " - " + end;
Unplanned
Last Updated:
24 Aug 2018 12:55
by ADMIN
ADMIN
Created by:
Dess | Tech Support Engineer, Principal
Comments:
0
Category:
Scheduler/Reminder
Type:
Bug Report
To reproduce:

            this.radScheduler1.ActiveViewType = Telerik.WinControls.UI.SchedulerViewType.Month;

            SchedulerMonthView monthView = this.radScheduler1.GetMonthView();
            DateTime start= new DateTime(2018, 8, 1);
            DateTime end= new DateTime(2018,8,31);
            monthView.ShowFullMonth = true;
            monthView.StartDate=start;
            monthView.RangeStartDate = start;
            monthView.RangeEndDate = end;

You will notice that you can navigate outside the specified range.

Workaround: manipulate the start date of the view:
this.radScheduler1.ActiveView.PropertyChanged += ActiveView_PropertyChanged;

        DateTime start = new DateTime(2018, 8, 1);
        DateTime end = new DateTime(2018,8,31);

        private void ActiveView_PropertyChanged(object sender, PropertyChangedEventArgs e)
        {
            if (e.PropertyName == "StartDate" && (this.radScheduler1.ActiveView.StartDate < start || start.AddDays(30) < this.radScheduler1.ActiveView.StartDate)
                || e.PropertyName == "WeekCount" && this.radScheduler1.ActiveView.EndDate > end)
            {
                this.radScheduler1.ActiveView.StartDate = start;
            }
        }
Unplanned
Last Updated:
25 May 2023 13:36
by ADMIN
Created by:
Paul Dell
Comments:
1
Category:
Scheduler/Reminder
Type:
Feature Request
This width is 6px by default and it doesn't offer convenient API for customizing it:
Unplanned
Last Updated:
15 Aug 2017 09:45
by ADMIN
ADMIN
Created by:
Dess | Tech Support Engineer, Principal
Comments:
0
Category:
Scheduler/Reminder
Type:
Feature Request
Implement similar functionality as the exact time rendering in Outlook (DayView) using the status area. Please refer to the attached screenshot.
Unplanned
Last Updated:
30 Mar 2016 13:01
by ADMIN
ADMIN
Created by:
Dimitar
Comments:
0
Category:
Scheduler/Reminder
Type:
Bug Report
To reproduce:
- Bind the scheduler to the default SchedulerData.mdb
- Add an appointment like this:

this.radScheduler1.Appointments.BeginUpdate();
Appointment appointment = CreateAppointment();
this.radScheduler1.Appointments.Add(appointment);
this.radScheduler1.Appointments.EndUpdate();

- Save the database
Unplanned
Last Updated:
30 Mar 2016 13:02
by ADMIN
ADMIN
Created by:
Dess | Tech Support Engineer, Principal
Comments:
0
Category:
Scheduler/Reminder
Type:
Bug Report
To reproduce:

public Form1()
{
    InitializeComponent();

    this.radScheduler1.Appointments.Add(new Appointment(DateTime.Today.AddHours(1),TimeSpan.FromHours(3),"Meeting"));
    this.radScheduler1.ActiveViewType = SchedulerViewType.Week;
    this.radScheduler1.GetWeekView().RangeFactor = ScaleRange.HalfHour;
    this.radScheduler1.SchedulerElement.DragDropBehavior.AutoScrollDayViewOnDrag = true;
    this.Size = new Size(800, 350);
}

It's necessary to stretch down the application so that a few hours are shown (let's say 4 hours) and the appointment is a bit less, for example 3 hours. If you look at the gif, I am scrolling down around 14, then I'm stopping a bit, while always keeping the mouse button pressed, and then I start scrolling up: at that time the scroll results in going down until 19, instead of going up.

Workaround:
 this.radScheduler1.SchedulerElement.DragDropBehavior = new CustomAppointmentDraggingBehavior(this.radScheduler1.SchedulerElement);

public class CustomAppointmentDraggingBehavior : AppointmentDraggingBehavior
{
    public CustomAppointmentDraggingBehavior(SchedulerVisualElement activeOwner) : base(activeOwner)
    {
    }

    protected override void HandleMouseMove(Point mousePos)
    {

        base.HandleMouseMove(mousePos);

        DayViewAppointmentsTable table = this.ActiveOwner.Scheduler.DragDropBehavior.ActiveOwner as DayViewAppointmentsTable;

        if (table != null && this.ActiveOwner.Scheduler.DragDropBehavior.AutoScrollDayViewOnDrag)
        {
            Point pt = table.PointFromScreen(Control.MousePosition);
            FieldInfo fi = typeof(DayViewAppointmentsTable).GetField("lastMovingPoint", System.Reflection.BindingFlags.NonPublic
                | System.Reflection.BindingFlags.Instance);
            fi.SetValue(table, pt);
        }
    }
}
Unplanned
Last Updated:
05 Aug 2016 09:14
by ADMIN
ADMIN
Created by:
Dess | Tech Support Engineer, Principal
Comments:
0
Category:
Scheduler/Reminder
Type:
Bug Report
To reproduce:

Public Class Form1
    Sub New()

        InitializeComponent()

        Me.RadScheduler1.EnableExactTimeRendering = True

        Dim dt = DateTime.Now
        Me.RadScheduler1.Appointments.Add(New Appointment(dt.AddMinutes(-10).AddSeconds(1), Now, "A1"))
        Me.RadScheduler1.Appointments.Add(New Appointment(dt.AddMinutes(-15), DateTime.Now.AddMinutes(-10), "A2"))
        Me.RadScheduler1.GetTimelineView().StartDate = DateAdd(DateInterval.Minute, -15, Now)

        Dim customScale As CustomTimescalePerMinute = New CustomTimescalePerMinute()
        Dim timelineView As SchedulerTimelineView = Me.RadScheduler1.GetTimelineView()
        timelineView.SchedulerTimescales.Add(customScale)

        timelineView.ShowTimescale(customScale)
        Dim currentScaling As SchedulerTimescale = timelineView.GetScaling()
        currentScaling.DisplayedCellsCount = 15
    End Sub
End Class

Public Class CustomTimescalePerMinute
Inherits MinutesTimescale
    Public Overrides ReadOnly Property ScalingFactor() As Integer
        Get
            Return 1
        End Get
    End Property
End Class

Note: the attached gif file illustrates the behavior. Initially, the first appointment's end is not rendered in the correct time slot. After scrolling, it is displayed correctly.

Workaround: force scrolling

Private Sub Form1_Load(sender As Object, e As EventArgs) Handles MyBase.Load
    Dim t As SchedulerTimelineViewElement = TryCast(Me.RadScheduler1.SchedulerElement.ViewElement, SchedulerTimelineViewElement)
    Dim value = t.NavigationElement.Value
    t.NavigationElement.Value += 1
    Me.RadScheduler1.SchedulerElement.RefreshViewElement()
    t.NavigationElement.Value = value
End Sub
Unplanned
Last Updated:
05 Aug 2016 07:46
by ADMIN
ADMIN
Created by:
Dess | Tech Support Engineer, Principal
Comments:
1
Category:
Scheduler/Reminder
Type:
Bug Report
To reproduce:

 public Form1()
 {
     InitializeComponent();

     this.radScheduler1.ActiveViewType = SchedulerViewType.Month;
     this.radScheduler1.Appointments.Add(new Appointment(new DateTime(9999,12,22),TimeSpan.FromMinutes(30),"A1"));
 }
Unplanned
Last Updated:
20 Nov 2017 16:18
by ADMIN
ADMIN
Created by:
Dess | Tech Support Engineer, Principal
Comments:
0
Category:
Scheduler/Reminder
Type:
Bug Report
If you want to show the borders for the weekdays, the left most border is not shown because another element is over the cell. It is not possible to hide this top left cell and show the left border for Sunday.
Unplanned
Last Updated:
20 Nov 2017 15:14
by ADMIN
ADMIN
Created by:
Dess | Tech Support Engineer, Principal
Comments:
0
Category:
Scheduler/Reminder
Type:
Bug Report
This is reproducible not only with Material theme but with the other themes as well.

Workaround:

        private void radScheduler1_CellFormatting(object sender, Telerik.WinControls.UI.SchedulerCellEventArgs e)
        {
            e.CellElement.ZIndex = 0;
        }