AllDay event is rendered on two days when using different TimeZone for SystemTimeZone with DefaultTimeZone

To reproduce: please run the attached sample project and have a look at the gif file.

Workaround: in the _HideWeekDays method, don't pass 0 width as a parameter in the SetColumnWidth method. Use 0.01 instead.
To reproduce:

public Form1()
{
    InitializeComponent();

    CultureInfo culture = new CultureInfo("en-US");
    culture.DateTimeFormat.FirstDayOfWeek = DayOfWeek.Monday;
    this.radScheduler1.Culture = culture;
    this.radScheduler1.ActiveViewType = Telerik.WinControls.UI.SchedulerViewType.Month;

    Appointment a = new Appointment(new DateTime(2016, 8, 29, 0, 0, 0), new DateTime(2016, 9, 5, 0, 0, 0), "Meeting");

    this.radScheduler1.Appointments.Add(a);

    this.radScheduler1.FocusedDate = new DateTime(2016, 9, 1);
}

Please refer to the attached gif file.
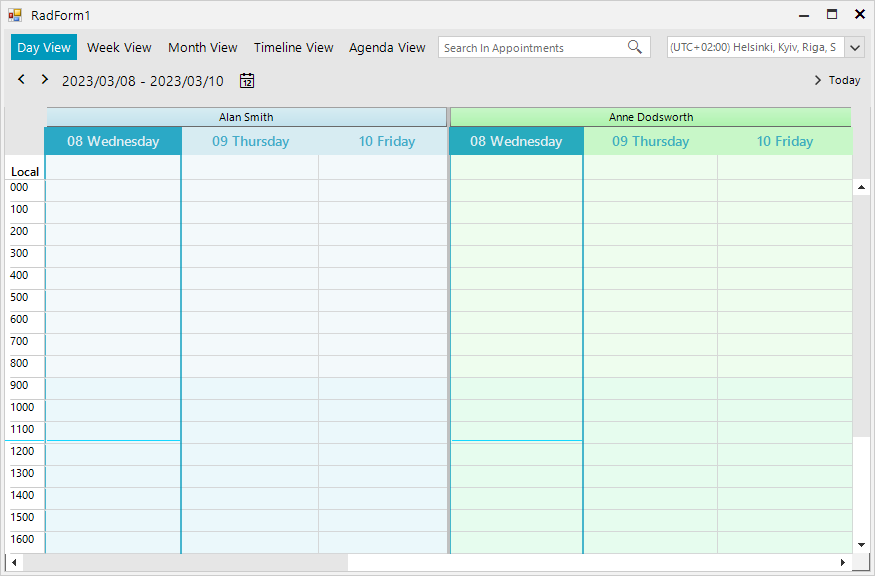
When RadScheduler is grouped by resources, the programmatically added Holidays are not displayed into the view:
    Sub New()
        InitializeComponent()

        Dim colors() As Color = {Color.LightBlue, Color.LightGreen, Color.LightYellow, Color.Red, Color.Orange, Color.Pink, Color.Purple, Color.Peru, Color.PowderBlue}
        Dim names() As String = {"Alan Smith", "Anne Dodsworth", "Boyan Mastoni", "Richard Duncan", "Maria Shnaider"}
        For i As Integer = 0 To names.Length - 1
            Dim resource As New Telerik.WinControls.UI.Resource()
            resource.Id = New EventId(i)
            resource.Name = names(i)
            resource.Color = colors(i)
            Me.RadScheduler1.Resources.Add(resource)
        Next i

        Me.RadScheduler1.GroupType = GroupType.Resource
        Me.RadScheduler1.ActiveView.ResourcesPerView = 2


        Dim holiday As Holiday = New Holiday()
        holiday.Date = New DateTime(2023, 3, 8)
        holiday.HolidayName = "International Women's Day"
        holiday.Location = "Bulgaria"
        Dim generateAppointment As Boolean = True
        Me.RadScheduler1.Holidays.AddHoliday(holiday, generateAppointment)
    End Sub
How it looks with resources:
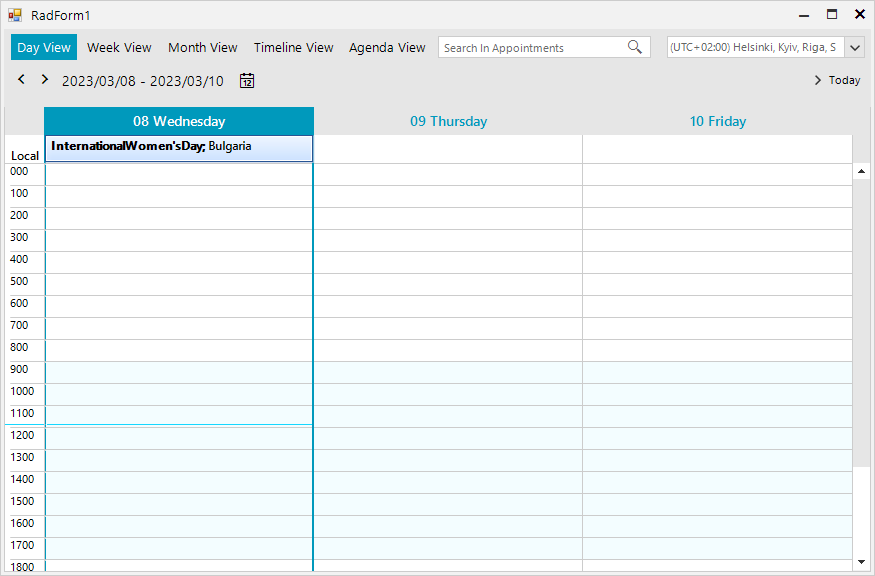
How it looks without resources:
To reproduce:

Color[] colors = new Color[]
{
    Color.LightBlue, Color.LightGreen, Color.LightYellow,
    Color.Red, Color.Orange, Color.Pink, Color.Purple, Color.Peru, Color.PowderBlue
};
Random rand = new Random();
for (int i = 0; i < 25; i++)
{
    Resource resource = new Resource();
    resource.Id = new EventId(i);
    resource.Name = i + ".Resource";
    resource.Color = colors[rand.Next(0, colors.Length)];
    this.radScheduler1.Resources.Add(resource);
}

this.radScheduler1.GroupType = GroupType.Resource;
this.radScheduler1.ActiveView.ResourcesPerView = this.radScheduler1.Resources.Count;

for (int i = 0; i < 3; i++)
{
    Appointment a = new Appointment(DateTime.Now.AddHours(i), TimeSpan.FromMinutes(30), "A" + i);
    a.ResourceId = this.radScheduler1.Resources.Last().Id;
    this.radScheduler1.Appointments.Add(a);
}

NOTE: it is also valid for the horizontal scrollbar in Timeline view.

Workaround: use the SetResourceSize to increase the last resource's width a little bit: http://docs.telerik.com/devtools/winforms/scheduler/views/grouping-by-resources
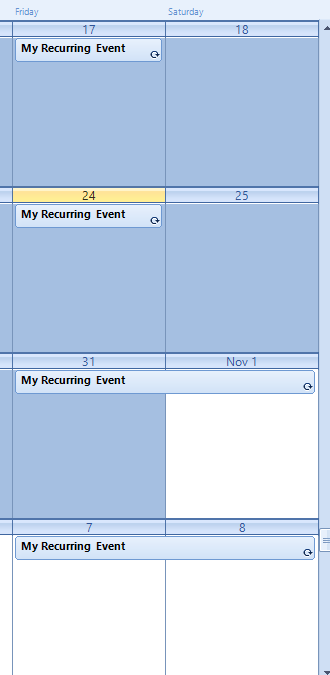
Currently,
I’m using the Radscheduler MultiDayView to create a “two week” view in which
the end user has the possibility to choose if he wants to see weekend days or
not.
When this
view is used in combination with appointments spanning multiple days and the display
of the weekend days, every thing works fine (with_weekend.png). The appointment
starts at 06/21/19 05:00 and ends 06/24/19 21:05.
However, if
weekend days are not shown in this view (without_weekend.png), part of the same
appointment is shown on 06/25/19 and the end time on 06/24/19 is also incorrect.
How can I solve this? It is not an option to show it as an “All day appointment” since the customer wants to know the exact start and end time.
To reproduce:
        Me.RadScheduler1.ActiveViewType = Telerik.WinControls.UI.SchedulerViewType.Timeline
        Dim timelineView As SchedulerTimelineView = Me.RadScheduler1.GetTimelineView()
        Dim currentScaling As SchedulerTimescale = timelineView.GetScaling()
        currentScaling.DisplayedCellsCount = 100

Try to scroll horizontally. Then, change the currentScaling.DisplayedCellsCount  property to 50 and try to scroll again. You will notice a considerable difference.

Workaround: reduce the number of the displayed visual cell elements by the DisplayedCellsCount.
To reproduce:

            this.radScheduler1.ActiveViewType = Telerik.WinControls.UI.SchedulerViewType.Month;

            SchedulerMonthView monthView = this.radScheduler1.GetMonthView();
            DateTime start= new DateTime(2018, 8, 1);
            DateTime end= new DateTime(2018,8,31);
            monthView.ShowFullMonth = true;
            monthView.StartDate=start;
            monthView.RangeStartDate = start;
            monthView.RangeEndDate = end;

You will notice that you can navigate outside the specified range.

Workaround: manipulate the start date of the view:
this.radScheduler1.ActiveView.PropertyChanged += ActiveView_PropertyChanged;

        DateTime start = new DateTime(2018, 8, 1);
        DateTime end = new DateTime(2018,8,31);

        private void ActiveView_PropertyChanged(object sender, PropertyChangedEventArgs e)
        {
            if (e.PropertyName == "StartDate" && (this.radScheduler1.ActiveView.StartDate < start || start.AddDays(30) < this.radScheduler1.ActiveView.StartDate)
                || e.PropertyName == "WeekCount" && this.radScheduler1.ActiveView.EndDate > end)
            {
                this.radScheduler1.ActiveView.StartDate = start;
            }
        }
To reproduce:
 public Form1()
 {
     InitializeComponent();

     for (int i = 0; i < 7; i++)
     {
         this.radScheduler1.Appointments.Add(new Appointment(DateTime.Now.AddHours(i),TimeSpan.FromHours(3),"App" + i));
     }
     this.radScheduler1.AutoSizeAppointments = true;
     this.radScheduler1.ActiveViewType = SchedulerViewType.Month;
     SchedulerMonthView monthView = this.radScheduler1.GetMonthView();

     monthView.EnableAppointmentsScrolling = true;
 }

Workaround: set the AutoSizeAppointments property to false.
To reproduce:
this.radScheduler1.RightToLeft = System.Windows.Forms.RightToLeft.Yes;
this.radScheduler1.Appointments.Add(new Appointment(DateTime.Now, TimeSpan.FromHours(2), "آقای حقیقت"));

Please refer to the attached screenshot.

Workaround:

private void radScheduler1_AppointmentFormatting(object sender, SchedulerAppointmentEventArgs e)
{
    e.AppointmentElement.UseHtml = false;
}
If you want to show the borders for the weekdays, the left most border is not shown because another element is over the cell. It is not possible to hide this top left cell and show the left border for Sunday.
This is reproducible not only with Material theme but with the other themes as well.

Workaround:

        private void radScheduler1_CellFormatting(object sender, Telerik.WinControls.UI.SchedulerCellEventArgs e)
        {
            e.CellElement.ZIndex = 0;
        }
Run the application on a Windows 10 machine and scroll to the bottom. Please refer to the attached gif file.
Please refer to the attached sample project. When you start the application the form's text indicates how many times the AppointmentFormatting event is fired for only 30 appointments - more than 400 times. The more appointments you have , the more times the vent is initially fired,e.g. if you have 50 appointmens it is fired If you switch between the different views you will see how the counter increases its value.
Please refer to the attached sample project and screenshot. Note that if RadScheduler is not grouped by resources, the scrollbar works as expected.
Please refer to the attached sample project. When you toggle the button the Visible property for the first resource is inverted. However, it doesn't take effect in RadScheduler and the resource is always visible.

Workaround: Currently, if you want to hide some of the resources, you should remove them from the Resources collection of RadScheduler. When you want to use them again, you should just add them to the same collection.