Use the attached sample project.
Sceen 1 (Screen with program shortcuts) on the right in the gif: this screen has display scale 125%
Screen 2 (Screen with the Form) on the left in the gif: this screen has display scale 100%
When all three toolwindows are placed in the forms, there is no issue. The Dropdown list of ToolWindow1 (floating, dockable..) when opened is placed correctly.
If I moved the ToolWindow3 from Screen2 to Screen1 and make it the most recent active window (by clicking on it), I go back to the Screen2 and open the dropdown list of Toolwindow1, this list's position is now wrong and the text size bigger. This is because it takes the display scale (125%) of the screen where the most recent active toolwindow (ToolWindow3 ) is.
If I popup the ToolWindow2, place it in Screen2 (the same screen with ToolWindow1), make ToolWindow2 the most recent active window, and open the dropdown list of Toolwindow1, this list's position is now correct and the text size normal. This is because it takes the display scale (100%) of the screen where the most recent active toolwindow (ToolWindow2 ) is.
Workaround: add app.manifest file and declare the application as DPI aware:
https://docs.telerik.com/devtools/winforms/telerik-presentation-framework/dpi-support#how-to-enable-hdpi-support-in-your-application
In this case, we have an MS standard Form with control position on the form. Each of the controls has the right anchor. Moving the form to a monitor with a higher resolution messed up the size of the controls.
How to reproduce: check the attached video
Workaround: select a color from a different tab or use the color picker
To reproduce: please refer to the attached sample project and gif file.

Workaround: use screentips: https://docs.telerik.com/devtools/winforms/telerik-presentation-framework/tooltips-and-screentips/screen-tips
To reproduce: add a RadLabel and change its cursor to Hand.

 this.radLabel1.Cursor = Cursors.Hand;

The PixelatedHandCursor.png shows the poor quality of the cursor which should be improved.

Workaround: https://stackoverflow.com/questions/6016995/un-antialiased-hand-cursor-in-windows-forms-apps/6017174#6017174

    public class LinkLabelEx : RadLabel
    {
        private const int WM_SETCURSOR = 0x0020;
        private const int IDC_HAND = 32649;

        [DllImport("user32.dll", CharSet = CharSet.Auto, SetLastError = true)]
        private static extern IntPtr LoadCursor(IntPtr hInstance, int lpCursorName);

        [DllImport("user32.dll", CharSet = CharSet.Auto)]
        private static extern IntPtr SetCursor(IntPtr hCursor);

        protected override void WndProc(ref Message m)
        {
            if (m.Msg == WM_SETCURSOR)
            {
                // Set the cursor to use the system hand cursor
                SetCursor(LoadCursor(IntPtr.Zero, IDC_HAND));

                // Indicate that the message has been handled
                m.Result = IntPtr.Zero;
                return;
            }

            base.WndProc(ref m);
        }
    }

The ImprovedCursorRendering.png  shows the improved cursor.
The performance of the DayView when the control is bound to a large number of recurring appointments and it is grouped by resources needs to be improved.
How to reproduce: enabled High DPI scaling and create a form as an MDI child with a RadDataEntry control in it
Workaround:  handle the Shown event of the MDI child and manually perform the scaling
private void radButtonElement1_Click(object sender, EventArgs e)
        {
            var view = new RadForm1
            {
                MdiParent = this
            };

            view.Shown += View_Shown;
            view.Show();
        }

        private void ScaleRadControls(Control c)
        {
            foreach (var item in c.Controls)
            {
                Control control = item as Control;
                if (control == null)
                {
                    continue;
                }

                this.mi.Invoke(control, new object[] { this.FormElement.DpiScaleFactor, BoundsSpecified.All });
                ScaleRadControls(control);
            }
        }

        MethodInfo mi;
        private void View_Shown(object sender, EventArgs e)
        {
            this.mi = typeof(Control).GetMethod("ScaleControl", BindingFlags.Instance | BindingFlags.NonPublic, null, new Type[] { typeof(SizeF), typeof(BoundsSpecified) }, null);
            RadForm1 v = sender as RadForm1;
            if (v != null)
            {
                ScaleRadControls(v.radDataEntry1.PanelContainer);
            }
        }
1. Set HDPI on your monitor (for example 150%)
2. Set RadDataEntry data source in RunTime
You will see that RadDataEntry hosted controls are not scaled correctly.
Note that there is a related problem if the data source is set in design time. Controls themselves will be scaled correctly, however, text box hosted control's High will not be scaled correctly.
Workaround:
You can subscribe to ItemInitializing event before you set the DataSource and proceed by scaling RadDataEntry hosted controls manually as shown in the following code snipped.
private void radButton1_Click(object sender, EventArgs e)
{
    this.radDataEntry1.ItemInitializing += RadDataEntry1_ItemInitializing;
    this.radDataEntry1.ItemDefaultSize = new Size(200, 26);

    radDataEntry1.DataSource = new Employee
    {
        FirstName = "Sarah",
        LastName = "Blake",
        Occupation = "Supplied Manager",
        StartingDate = new DateTime(2005, 04, 12),
        IsMarried = true,
        Salary = 3500,
        Gender = Gender.Female
    };
}
private void RadDataEntry1_ItemInitializing(object sender, ItemInitializingEventArgs e)
{
if (this.radDataEntry1.RootElement.DpiScaleFactor.Width != 1)
{
foreach (Control control in e.Panel.Controls)
{
control.Scale(this.radDataEntry1.RootElement.DpiScaleFactor);
}
}
}
1. Set the DPI of your main monitor to 150% and the DPI of your secondary monitor to 100%.
2. Start your main form containing RadDataEntry on your secondary monitor.
You will see that that hosted controls inside RadDataEntry are not scaled correctly.
Workaround:
Start your main form on your secondary monitor inside OnShown event.
protected override void OnShown(EventArgs e)
{
    base.OnShown(e);

    this.Location = new Point(-800, 100);
}
The writing-mode attribute is ignored when rendering RadSvgImage.
Here is a sample SVG:
<svg width="200" height="200" viewBox="0 0 200 200" version="1.1" xmlns="http://www.w3.org/2000/svg" xmlns:svg="http://www.w3.org/2000/svg">
<g>
    <text style="font-size:20px;writing-mode:tb;" x="30" y="30">
        Vertical text
    </text>
    <text style="font-size:20px;writing-mode:vertical-lr;" x="50" y="50">
        Text 2
    </text>
</g>
</svg>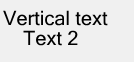
The Edge browser renders it correctly:

Steps to Reproduce:
Create a new WinForms application targeting .NET 9.
Add a
RadStatusStripto the main form.Run the application.
Snap the form to the left or right edge of the screen (using Windows Snap).
Minimize the form.
Restore the form.
Expected Behavior:
The form should maintain its original size and remain fully visible on screen after being restored.
Actual Behavior:
Every time the form is minimized and restored, it increases in height. After a few cycles, the bottom part of the form — including the RadStatusStrip — becomes hidden behind the Windows taskbar (Start menu).
Additional Info:
The issue only occurs when a
RadStatusStripis added to the form.The issue does not occur when using a standard
StatusStripfrom WinForms.The problem occurs consistently and can be reproduced easily.
Tested both in debug mode and with a compiled executable.
Attachments:
Screenshots (before and after restore).
Sample reproduction project (if needed).
This is only repeated in windows 10
Steps to reproduce:
1. Drag a grid on the form
2. Drag one or more controls over the grid - at this point in the Document Outline you can see the dragged control is a child of the grid
3. Open the Property Builder of the grid and close it - at this point the dragged control disappears

Workaround:
1. Open the Designer.cs file, and locate the line, where the control is added to the grid e.g.
            this.radGridView2.Controls.Add(this.radButton4);
and change it to:
            this.Controls.Add(this.radButton4);

If need be, set the Location property of the control at design time, to position it at the desired place.

2. Alternatively, you can place the control outside the grid bounds and after selecting it, use the arrow keys to position is over the grid. This will not make it its child, hence the issue will not appear.
To reproduce:
- Drag RadDropDownList control on a form, expand its DropDownListElement property, and change the ItemHeight
- Another case is, on a RadForm, expand FormElement>TitleBarElement and set its Visibility to Collapsed

Workaround: set the desired property at runtime
radDropDownList1.DropDownListElement.ItemHeight = 22;
or:
1. Insert some text
2. Change its span properties (e.g. set the font weight to Bold)
3. Position the caret right after the last letter of this text and type several letters
Observed: The span properties are applied to the new text as well
Expected: The new text shouldn't have those properties
To reproduce:
Copy an image and paste is several times inside the document.