Please run the sample project and follow the steps:
1.Open the attached solution in Visual Studio - I am using VS 2022.2.Select the Grid.
3.Edit the templates.
4.For gridViewTemplate1, set SelectNewRowasCurrent to false.
5.Close the editor.
6.Close the WinForms designer.
7.Open the WinForms designer again.
To reproduce, rebind the grid to a data table on button click and show grid's search row.
public RadForm1()
{
InitializeComponent();
this.radGridView1.AllowSearchRow = true;
}
private void RadButton1_Click()
{
DataTable dt = this.GetData();
this.radGridView1.DataSource = dt;
}
private DataTable GetData()
{
DataTable data = new DataTable();
for (int i = 0; i < 5; i++)
{
data.Columns.Add("Column " + i, typeof(int));
data.Columns.Add("Column " + i + 1, typeof(string));
data.Columns.Add("Column " + i + 2, typeof(string));
}
for (int k = 0; k < 5000; k++)
{
object[] parameters = new object[15];
for (int i = 0; i < 15; i += 3)
{
parameters[i] = k;
parameters[i + 1] = "Text " + i;
parameters[i + 2] = "Text " + i + 1;
}
data.Rows.Add(parameters);
}
return data;
}
Please use the attached sample project.
Hi There,
This call is only a nice to have, it is not critical at all. It is just a slight annoyance when building the Grid's columns - especially when there are many columns to adjust. My workflow is usually as follow.
Add all the columns needed, then after that I will run through all the columns and want to set the widths. But my speed is broken because I can't tab between the 3 width properties: Width, Min Width, Max Width. I have to click to put focus the the next value.
If possible, please can you correct the tab indexes?
Thank you
Kind Regards
Ben
PS. You may close this ticket immediately - this is only a request.
- Filter the column "code" to show only "(Blanks)"
- Hit the "Save Layout" button to save the layout into a string
- Hit the "Load Layout" button. The row is gone
Use the following code snippet:
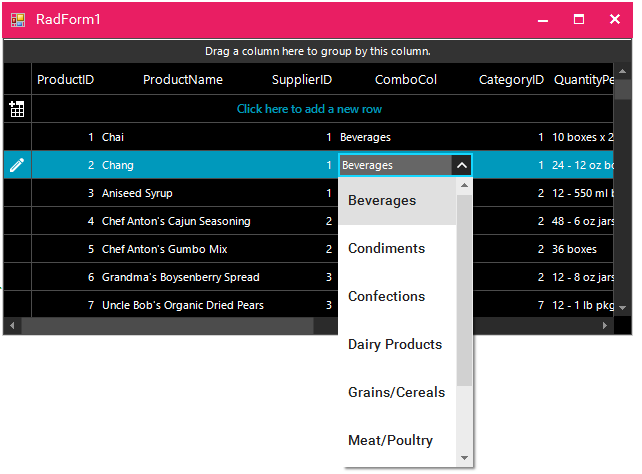
            ThemeResolutionService.ApplicationThemeName = "MaterialPink";
            radGridView1.ElementTree.EnableApplicationThemeName = false;
            radGridView1.ThemeName = "FluentDark";
Workaround:
        private void radGridView1_CellEditorInitialized(object sender, GridViewCellEventArgs e)
        {
            RadDropDownListEditor ddlEditor = e.ActiveEditor as  RadDropDownListEditor;
            if (ddlEditor != null)
            {
                RadDropDownListEditorElement el = ddlEditor.EditorElement as RadDropDownListEditorElement;
                el.Popup.ElementTree.EnableApplicationThemeName = false;
                el.Popup.ThemeName = this.radGridView1.ThemeName;
            }
        }
Stack Trace:
at System.Collections.ArrayList.BinarySearch(Int32 index, Int32 count, Object value, IComparer comparer)
at Telerik.WinControls.UI.TextBoxWrapPanel.BinarySearch(LineInfo line, IComparer comparer)
at Telerik.WinControls.UI.TextBoxNavigator.GetPositionFromOffset(Int32 offset)
at Telerik.WinControls.UI.RadTextBoxControlElement.Select(Int32 start, Int32 length)
at Telerik.WinControls.UI.RadTextBoxControlEditor.EndEdit()
at Telerik.WinControls.UI.GridViewEditManager.EndEditCore(Boolean validate, Boolean cancel)
at Telerik.WinControls.UI.GridViewEditManager.CloseEditor()
Please refer to the attached sample project and follow the steps from the grid file:
Steps to reproduce:
1. Filter the checkbox column to only show unchecked rows
2. Enter "5" for filtering the Name column
3. Click the checkbox column on the bottom row
4. Remove filter value in the Name column
This will result in the unrelated record showing as checked. Scrolling or changing sorting may refresh the cell. If the filter is cleared by using the No filter menu option, the problem is not observed
Please refer to the attached sample project and follow the steps in the gif file.
Workaround: custom filtering to control which rows to be visible or not: https://docs.telerik.com/devtools/winforms/controls/gridview/filtering/custom-filtering
        private void radGridView1_CustomFiltering(object sender, GridViewCustomFilteringEventArgs e)
        {
            e.Handled = true;
            e.Visible =  e.Row.Cells["Value"].Value.Equals( Double.NaN);
        }
Two of the grids (B & C) are on the same tab and the other (A) on a different tab.
Only one tab can be visible at any one time, so you can either see and interact with the single grid (A) or the other two grids (B & C).
I need to be able to select a row in C (based on a criteria) when you click on a row in A or B.
Grid C has paging enabled.
I can successfully select the desired row in C when I click on a row in B and see the paging change to show the selected row.
But, when I click on a row in A and find a matching row in C, the row seems to get selected but the paging does not move to where the selected row is.
You can also note it in demo application with this settings:
If you define which columns to be printed on separate pages and try to use the Print Settings dialog to change the orientation for example, the multi-page printing gets lost:
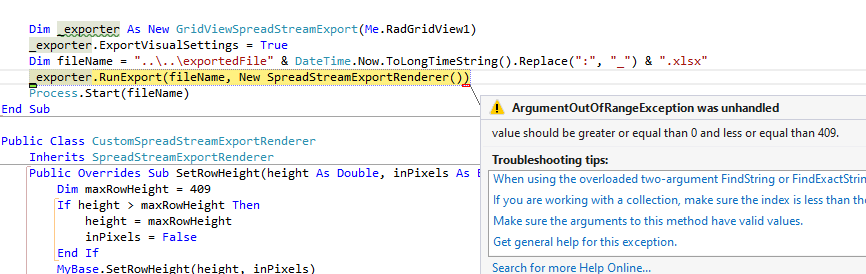
Here is the code snippet which result is illustrated in the attached gif file:
    Private Sub RadForm1_Load(sender As Object, e As EventArgs) Handles MyBase.Load
        Me.CustomersTableAdapter.Fill(Me.NwindDataSet.Customers)

        Me.RadGridView1.DataSource = Me.CustomersBindingSource
        Me.RadGridView1.BestFitColumns()
    End Sub

    Private Sub RadButton1_Click(sender As Object, e As EventArgs) Handles RadButton1.Click

        Dim document As New RadPrintDocument()
        document.AssociatedObject = Me.RadGridView1

        Dim printStyle As GridPrintStyle = New GridPrintStyle(RadGridView1)
        Dim renderer As TableViewDefinitionPrintRenderer = New TableViewDefinitionPrintRenderer(RadGridView1)
        renderer.PrintPages.Add(RadGridView1.Columns(0), RadGridView1.Columns(2), RadGridView1.Columns(5))
        renderer.PrintPages.Add(RadGridView1.Columns(0), RadGridView1.Columns(1), RadGridView1.Columns(9))
        renderer.PrintPages.Add(RadGridView1.Columns(8), RadGridView1.Columns(7))
        renderer.PrintPages.Add(RadGridView1.Columns(3), RadGridView1.Columns(4), RadGridView1.Columns(6))
        printStyle.PrintRenderer = renderer
        RadGridView1.PrintStyle = printStyle

        Dim dialog As New RadPrintPreviewDialog(document)
        dialog.ShowDialog()

End SubTo reproduce:
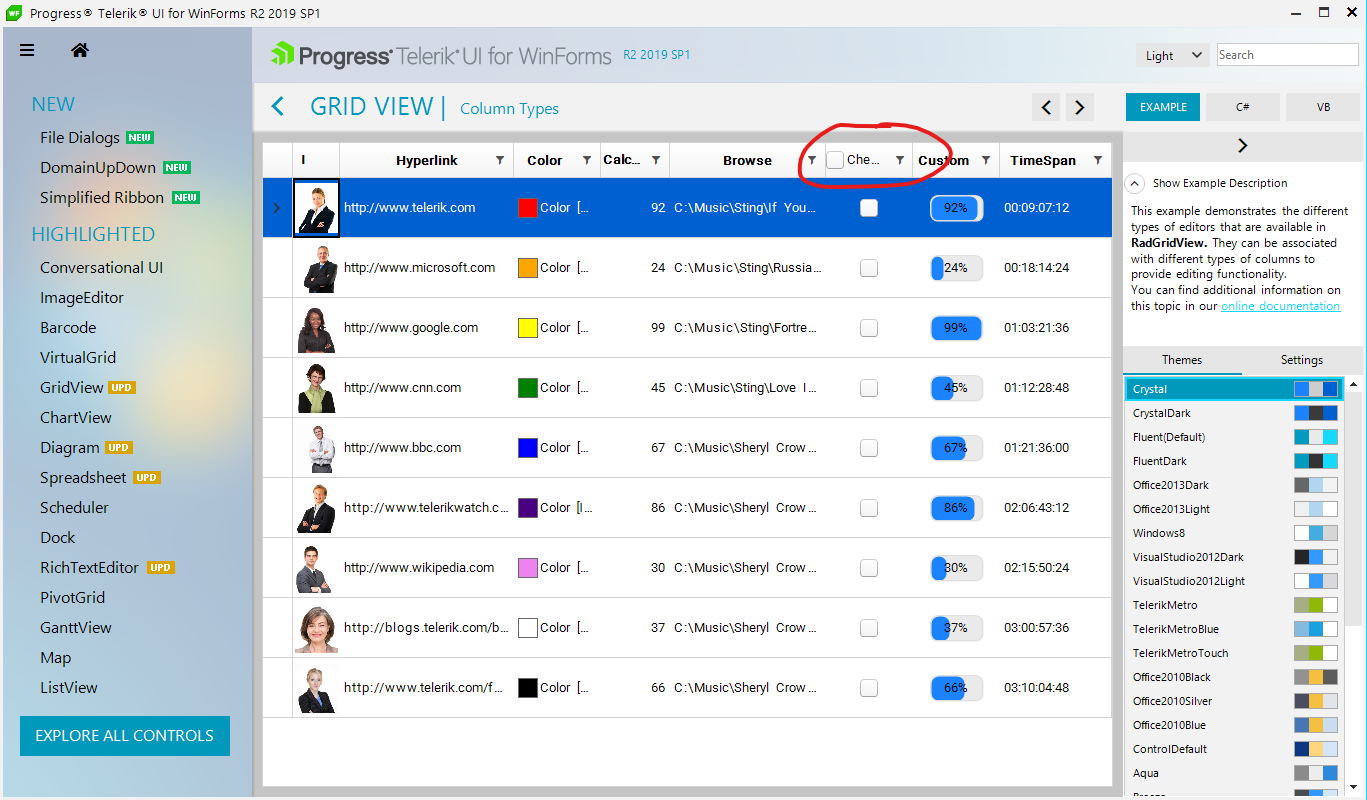
1. Bind a RadGridView to the Northwind.Products table
2. Enable the header checkbox for the Discontinued column
3. Set the ReadOnly property either for the grid or for the specific column.
The header checkbox is not allowed to be toggled. However, you can toggle/untoggle it which affects all the data rows.
We got an issue with the Winforms grid view component while displaying a negative TimeSpan.
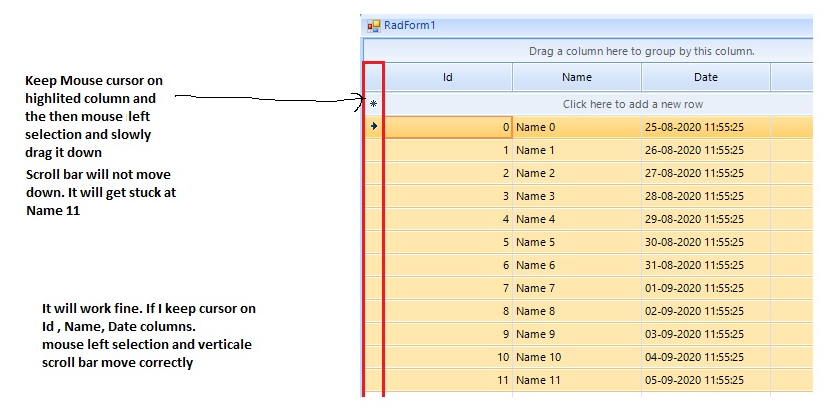
Currently, due to the specificity of the internal implementation for this scrolling behavior, the possible solution that I can suggest is to hide the row header by setting the ShowRowHeaderColumn property to false.
this.radGridView1.ShowRowHeaderColumn = false;
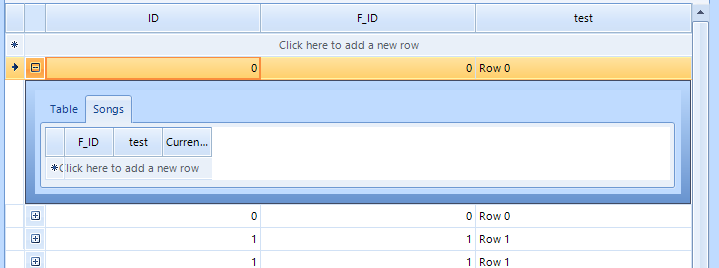
To reproduce:
1. Expand a parent row in hierarchical grid.
2. Click on the second tab
3. If the child grid doesn't have any rows, the CurrentViewChanged event will not fire.
We found one problem with the RadListFilterPopup (WindowsForms)
when we use the char '/' to search the filter, our App close.
When we use one specific type of keyboard (with numeric and it has char '.' in it) the char '.' make the same error.