Unplanned
Last Updated:
31 Aug 2017 08:09
by ADMIN
ADMIN
Created by:
Dess | Tech Support Engineer, Principal
Comments:
2
Category:
Scheduler/Reminder
Type:
Bug Report
Please refer to the attached sample project. When you start the application the form's text indicates how many times the AppointmentFormatting event is fired for only 30 appointments - more than 400 times. The more appointments you have , the more times the vent is initially fired,e.g. if you have 50 appointmens it is fired If you switch between the different views you will see how the counter increases its value.
Unplanned
Last Updated:
16 May 2019 05:11
by ADMIN
ADMIN
Created by:
Dess | Tech Support Engineer, Principal
Comments:
0
Category:
Scheduler/Reminder
Type:
Bug Report
To reproduce:
        Me.RadScheduler1.ActiveViewType = Telerik.WinControls.UI.SchedulerViewType.Timeline
        Dim timelineView As SchedulerTimelineView = Me.RadScheduler1.GetTimelineView()
        Dim currentScaling As SchedulerTimescale = timelineView.GetScaling()
        currentScaling.DisplayedCellsCount = 100

Try to scroll horizontally. Then, change the currentScaling.DisplayedCellsCount  property to 50 and try to scroll again. You will notice a considerable difference.

Workaround: reduce the number of the displayed visual cell elements by the DisplayedCellsCount.
Unplanned
Last Updated:
07 Jun 2018 10:01
by ADMIN
ADMIN
Created by:
Dess | Tech Support Engineer, Principal
Comments:
0
Category:
Scheduler/Reminder
Type:
Bug Report
To reproduce:
 public Form1()
 {
     InitializeComponent();

     for (int i = 0; i < 7; i++)
     {
         this.radScheduler1.Appointments.Add(new Appointment(DateTime.Now.AddHours(i),TimeSpan.FromHours(3),"App" + i));
     }
     this.radScheduler1.AutoSizeAppointments = true;
     this.radScheduler1.ActiveViewType = SchedulerViewType.Month;
     SchedulerMonthView monthView = this.radScheduler1.GetMonthView();

     monthView.EnableAppointmentsScrolling = true;
 }

Workaround: set the AutoSizeAppointments property to false.
Unplanned
Last Updated:
03 Nov 2020 05:39
by ADMIN
ADMIN
Created by:
Dess | Tech Support Engineer, Principal
Comments:
2
Category:
Scheduler/Reminder
Type:
Bug Report
To reproduce:

Color[] colors = new Color[]
{
    Color.LightBlue, Color.LightGreen, Color.LightYellow,
    Color.Red, Color.Orange, Color.Pink, Color.Purple, Color.Peru, Color.PowderBlue
};
Random rand = new Random();
for (int i = 0; i < 25; i++)
{
    Resource resource = new Resource();
    resource.Id = new EventId(i);
    resource.Name = i + ".Resource";
    resource.Color = colors[rand.Next(0, colors.Length)];
    this.radScheduler1.Resources.Add(resource);
}

this.radScheduler1.GroupType = GroupType.Resource;
this.radScheduler1.ActiveView.ResourcesPerView = this.radScheduler1.Resources.Count;

for (int i = 0; i < 3; i++)
{
    Appointment a = new Appointment(DateTime.Now.AddHours(i), TimeSpan.FromMinutes(30), "A" + i);
    a.ResourceId = this.radScheduler1.Resources.Last().Id;
    this.radScheduler1.Appointments.Add(a);
}

NOTE: it is also valid for the horizontal scrollbar in Timeline view.

Workaround: use the SetResourceSize to increase the last resource's width a little bit: http://docs.telerik.com/devtools/winforms/scheduler/views/grouping-by-resources
Unplanned
Last Updated:
19 Feb 2018 13:46
by ADMIN
ADMIN
Created by:
Dess | Tech Support Engineer, Principal
Comments:
4
Category:
Scheduler/Reminder
Type:
Bug Report
To reproduce:
this.radScheduler1.RightToLeft = System.Windows.Forms.RightToLeft.Yes;
this.radScheduler1.Appointments.Add(new Appointment(DateTime.Now, TimeSpan.FromHours(2), "آقای حقیقت"));

Please refer to the attached screenshot.

Workaround:

private void radScheduler1_AppointmentFormatting(object sender, SchedulerAppointmentEventArgs e)
{
    e.AppointmentElement.UseHtml = false;
}
Unplanned
Last Updated:
11 Jul 2016 08:29
by ADMIN
ADMIN
Created by:
Dess | Tech Support Engineer, Principal
Comments:
0
Category:
Scheduler/Reminder
Type:
Bug Report
To reproduce:

public RadRibbonForm1()
{
    InitializeComponent();

    this.radScheduler1.FocusedDate = new DateTime(2016, 1, 1);
    this.radScheduler1.ActiveViewType = Telerik.WinControls.UI.SchedulerViewType.Timeline;
    SchedulerTimelineView timelineView = this.radScheduler1.GetTimelineView();
    timelineView.RangeStartDate = new DateTime(2016, 1, 1, 00, 00, 00);
    timelineView.RangeEndDate = new DateTime(2016, 12, 31, 23, 59, 59);
    timelineView.StartDate = new DateTime(2016, 1, 1, 00, 00, 00);

    Appointment appointment = new Appointment(new DateTime(2016, 1, 1, 00, 00, 00), new DateTime(2016, 1, 10, 00, 00, 00), "Quarter 1");
    Appointment appointment2 = new Appointment(new DateTime(2016, 2, 1, 00, 00, 00), new DateTime(2016, 2, 10, 00, 00, 00), "Quarter 1");
    Appointment appointment3 = new Appointment(new DateTime(2016, 4, 1, 00, 00, 00), new DateTime(2016, 4, 10, 00, 00, 00), "Quarter 2");
    Appointment appointment4 = new Appointment(new DateTime(2016, 5, 1, 00, 00, 00), new DateTime(2016, 6, 10, 00, 00, 00), "Quarter 2");
    Appointment appointment5 = new Appointment(new DateTime(2016, 7, 1, 00, 00, 00), new DateTime(2016, 7, 10, 00, 00, 00), "Quarter 3");
    Appointment appointment6 = new Appointment(new DateTime(2016, 8, 1, 00, 00, 00), new DateTime(2016, 8, 10, 00, 00, 00), "Quarter 3");
    Appointment appointment7 = new Appointment(new DateTime(2016, 11, 1, 00, 00, 00), new DateTime(2016, 11, 10, 00, 00, 00), "Quarter 4");
    Appointment appointment8 = new Appointment(new DateTime(2016, 12, 1, 00, 00, 00), new DateTime(2016, 12, 10, 00, 00, 00), "Quarter 4");

    this.radScheduler1.Appointments.Add(appointment);
    this.radScheduler1.Appointments.Add(appointment2);
    this.radScheduler1.Appointments.Add(appointment3);
    this.radScheduler1.Appointments.Add(appointment4);
    this.radScheduler1.Appointments.Add(appointment5);
    this.radScheduler1.Appointments.Add(appointment6);
    this.radScheduler1.Appointments.Add(appointment7);
    this.radScheduler1.Appointments.Add(appointment8);

    QuarterTimescale qTimeScale = new QuarterTimescale();
    qTimeScale.DisplayedCellsCount = 4;
    timelineView.SchedulerTimescales.Add(qTimeScale);
    this.radScheduler1.GetTimelineView().ShowTimescale(qTimeScale);
}

class QuarterTimescale : MonthTimescale
{
    public override int ScalingFactor
    {
        get
        {
            return 3;
        }
    }

    public override string Name
    {
        get
        {
            return "Quarter";
        }
    }
}
Unplanned
Last Updated:
16 Feb 2024 13:02
by ADMIN
ADMIN
Created by:
Dess | Tech Support Engineer, Principal
Comments:
0
Category:
Scheduler/Reminder
Type:
Bug Report
To reproduce:

public Form1()
{
    InitializeComponent();

    CultureInfo culture = new CultureInfo("en-US");
    culture.DateTimeFormat.FirstDayOfWeek = DayOfWeek.Monday;
    this.radScheduler1.Culture = culture;
    this.radScheduler1.ActiveViewType = Telerik.WinControls.UI.SchedulerViewType.Month;

    Appointment a = new Appointment(new DateTime(2016, 8, 29, 0, 0, 0), new DateTime(2016, 9, 5, 0, 0, 0), "Meeting");

    this.radScheduler1.Appointments.Add(a);

    this.radScheduler1.FocusedDate = new DateTime(2016, 9, 1);
}

Please refer to the attached gif file.
Unplanned
Last Updated:
07 Nov 2017 15:21
by ADMIN
ADMIN
Created by:
Dess | Tech Support Engineer, Principal
Comments:
0
Category:
Scheduler/Reminder
Type:
Bug Report
Run the application on a Windows 10 machine and scroll to the bottom. Please refer to the attached gif file.
Unplanned
Last Updated:
08 Mar 2023 10:01
by ADMIN
Created by:
Fabian
Comments:
1
Category:
Scheduler/Reminder
Type:
Bug Report
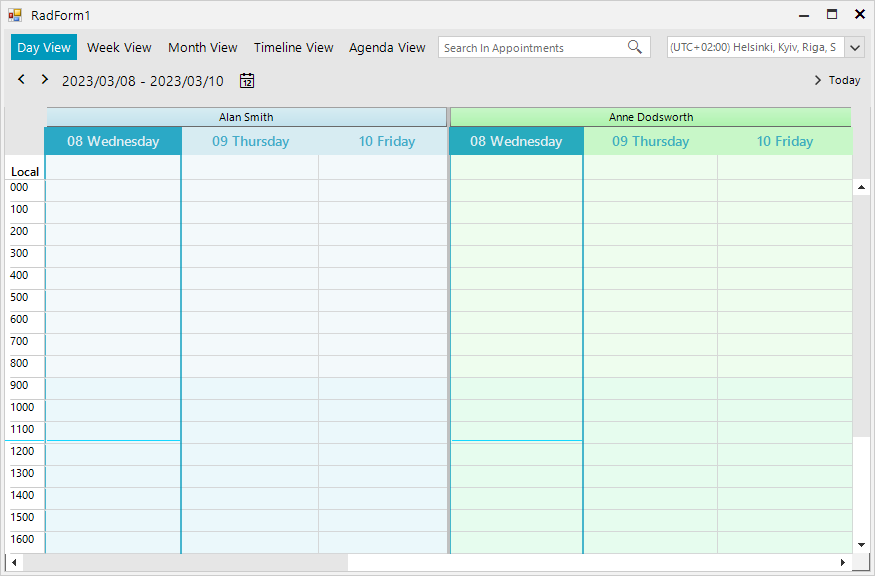
When RadScheduler is grouped by resources, the programmatically added Holidays are not displayed into the view:
Sub New()
InitializeComponent()
Dim colors() As Color = {Color.LightBlue, Color.LightGreen, Color.LightYellow, Color.Red, Color.Orange, Color.Pink, Color.Purple, Color.Peru, Color.PowderBlue}
Dim names() As String = {"Alan Smith", "Anne Dodsworth", "Boyan Mastoni", "Richard Duncan", "Maria Shnaider"}
For i As Integer = 0 To names.Length - 1
Dim resource As New Telerik.WinControls.UI.Resource()
resource.Id = New EventId(i)
resource.Name = names(i)
resource.Color = colors(i)
Me.RadScheduler1.Resources.Add(resource)
Next i
Me.RadScheduler1.GroupType = GroupType.Resource
Me.RadScheduler1.ActiveView.ResourcesPerView = 2
Dim holiday As Holiday = New Holiday()
holiday.Date = New DateTime(2023, 3, 8)
holiday.HolidayName = "International Women's Day"
holiday.Location = "Bulgaria"
Dim generateAppointment As Boolean = True
Me.RadScheduler1.Holidays.AddHoliday(holiday, generateAppointment)
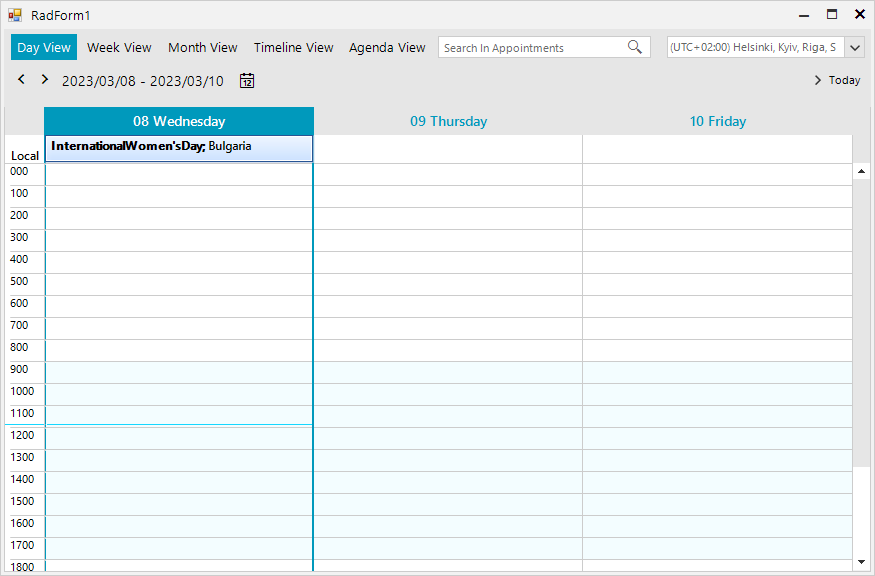
End SubHow it looks with resources:
How it looks without resources:
Unplanned
Last Updated:
30 Mar 2016 13:00
by ADMIN
ADMIN
Created by:
Peter
Comments:
0
Category:
Scheduler/Reminder
Type:
Bug Report
RadScheduler/RadSchedulerNavigator crashes upon BindingContext change during being/end initialize
Unplanned
Last Updated:
30 Mar 2016 13:01
by ADMIN
ADMIN
Created by:
Dess | Tech Support Engineer, Principal
Comments:
0
Category:
Scheduler/Reminder
Type:
Bug Report
Workaround: subscribe to the PanGesture event and set the StartDate property of the current view to the desired new date.
Unplanned
Last Updated:
30 Mar 2016 13:02
by ADMIN
ADMIN
Created by:
Dess | Tech Support Engineer, Principal
Comments:
0
Category:
Scheduler/Reminder
Type:
Bug Report
To reproduce:

1. Add a RadDock with one DocumentWindow.
2. Place a RadSchedulerNavigator in the DocumentWindow.
3. Add a RadButton and use the following code snippet:

 private void radButton1_Click(object sender, EventArgs e)
 {
     this.radSchedulerNavigator1.SchedulerNavigatorElement.TimeZonesDropDown.SelectedIndexChanging += TimeZonesDropDown_SelectedIndexChanging;
     string path = @"..\..\layout.xml";
     this.radDock1.SaveToXml(path);
     this.radDock1.LoadFromXml(path);

     RadScheduler sched = new RadScheduler();
     this.documentWindow1.Controls.Add(sched);
     sched.Dock = DockStyle.Left;

     this.radSchedulerNavigator1.AssociatedScheduler = this.documentWindow1.Controls[1] as RadScheduler;
 }

After running the application and clicking the button, you will notice that RadScheduler has time zone "Casablanca"  but the RadSchedulerNavigator has a different time zone.

Workaround: associate the RadSchedulerNavigator  before loading the layout.
Unplanned
Last Updated:
30 Mar 2016 13:04
by ADMIN
ADMIN
Created by:
Hristo
Comments:
0
Category:
Scheduler/Reminder
Type:
Bug Report
Workaround:
public class MyTimelineGroupingByResourcesElement : TimelineGroupingByResourcesElement
{
    public MyTimelineGroupingByResourcesElement(RadScheduler scheduler, SchedulerView view)
        : base(scheduler, view)
    { }

    public override void NavigateForward()
    {
        TimeSpan ts = (this.View as SchedulerTimelineView).RangeEndDate - this.View.StartDate;
        int differenceInDays = ts.Days;
        int displayedCells = (this.View as SchedulerTimelineView).GetScaling().DisplayedCellsCount;

        if (differenceInDays >= displayedCells)
        {
            base.NavigateForward();
        }
    }
}

public class MyElementProvider : SchedulerElementProvider
{
    public MyElementProvider(RadScheduler scheduler)
        : base(scheduler)
    { }

    protected override T CreateElement<T>(SchedulerView view, object context)
    {
        if (typeof(T) == typeof(TimelineGroupingByResourcesElement))
        {
            return new MyTimelineGroupingByResourcesElement(this.Scheduler, view) as T;
        }

        return base.CreateElement<T>(view, context);
    }
}

 public RadForm2()
        {
            InitializeComponent();

            this.radScheduler1.ElementProvider = new MyElementProvider(this.radScheduler2);
        }
Unplanned
Last Updated:
30 Mar 2016 13:04
by ADMIN
ADMIN
Created by:
Dess | Tech Support Engineer, Principal
Comments:
0
Category:
Scheduler/Reminder
Type:
Bug Report
To reproduce:

public Form1()
{
    InitializeComponent();

    this.radScheduler1.ActiveViewType = Telerik.WinControls.UI.SchedulerViewType.Timeline;
    this.radScheduler1.EnableGesture(Telerik.WinControls.GestureType.Pan);
    this.radScheduler1.DisableGesture(Telerik.WinControls.GestureType.Zoom);
    this.radScheduler1.ZoomGesture+=radScheduler1_ZoomGesture;
    this.radScheduler1.PanGesture+=radScheduler1_PanGesture;
}

private void radScheduler1_PanGesture(object sender, Telerik.WinControls.PanGestureEventArgs e)
{
    Console.WriteLine("Pan should fire");
}

private void radScheduler1_ZoomGesture(object sender, Telerik.WinControls.ZoomGestureEventArgs e)
{
    Console.WriteLine("Zoom should NOT fire");
}

Workaround:
public class CustomScheduler : RadScheduler
{
    public override string ThemeClassName
    {
        get
        {
            return typeof(RadScheduler).FullName;
        }
    }

    protected override void OnZoomGesture(Telerik.WinControls.ZoomGestureEventArgs args)
    {
        //stop the basic logic
        //base.OnZoomGesture(args);
    }
}
Unplanned
Last Updated:
06 May 2016 06:11
by ADMIN
ADMIN
Created by:
Dess | Tech Support Engineer, Principal
Comments:
0
Category:
Scheduler/Reminder
Type:
Bug Report
To reproduce:

this.radScheduler1.ActiveViewType = Telerik.WinControls.UI.SchedulerViewType.Month;
SchedulerMonthView monthView = this.radScheduler1.GetMonthView();

monthView.WeekCount = 5;
monthView.EnableCellOverflowButton = false;
monthView.EnableAppointmentsScrolling = true;
monthView.ShowVerticalNavigator = false;

for (int i = 0; i < 5; i++)
{
    this.radScheduler1.Appointments.Add(new Appointment(DateTime.Now, TimeSpan.FromDays(2), "Test" + i));
}
for (int i = 5; i < 10; i++)
{
    this.radScheduler1.Appointments.Add(new Appointment(DateTime.Now.AddDays(7), TimeSpan.FromDays(2), "Test" + i));
}
for (int i = 10; i < 15; i++)
{
    this.radScheduler1.Appointments.Add(new Appointment(DateTime.Now.AddDays(14), TimeSpan.FromDays(2), "Test" + i));
}
this.radScheduler1.Appointments.Add(new Appointment(DateTime.Now.AddMinutes(5),TimeSpan.FromDays(8),"Last"));
this.radScheduler1.Appointments.Add(new Appointment(DateTime.Now, TimeSpan.FromDays(14), "A"));
this.radScheduler1.Appointments.Add(new Appointment(DateTime.Now.AddDays(7), TimeSpan.FromDays(20), "B"));

Workaround: use the cell overflow button: SchedulerMonthView.EnableCellOverflowButton=true.
Unplanned
Last Updated:
06 Jun 2016 13:47
by ADMIN
ADMIN
Created by:
Dess | Tech Support Engineer, Principal
Comments:
0
Category:
Scheduler/Reminder
Type:
Bug Report
Please refer to the attached gif file illustrating how to reproduce the problem with the Demo application. When you define a new appointment with 24 months interval, it is expected to have this event every 2 years, not each year.

To reproduce: you can use the following code snippet as well:

MonthlyRecurrenceRule monthlyRecurrenceRule = new MonthlyRecurrenceRule(DateTime.Now, WeekDays.Monday, 2, 24);
Appointment a = new Appointment(DateTime.Now, TimeSpan.FromHours(3), "Test");
a.RecurrenceRule = monthlyRecurrenceRule;
this.radScheduler1.Appointments.Add(a);


Workaround:

 public Form1()
 {
     InitializeComponent();

     this.radScheduler1.AppointmentAdded += radScheduler1_AppointmentAdded;
 }

 private void radScheduler1_AppointmentAdded(object sender, AppointmentAddedEventArgs e)
 {
     MonthlyRecurrenceRule montlyRule = e.Appointment.RecurrenceRule as MonthlyRecurrenceRule;
     if (montlyRule != null)
     {
         CustomMonthlyRecurrenceRule rrule = new CustomMonthlyRecurrenceRule();
         rrule.Start = montlyRule.Start;
         rrule.End = montlyRule.End;
         rrule.Interval = montlyRule.Interval;
         rrule.Offset = montlyRule.Offset;
         rrule.WeekDays = montlyRule.WeekDays;
         rrule.WeekNumber = montlyRule.WeekNumber;
         rrule.FirstDayOfWeek = montlyRule.FirstDayOfWeek;
         rrule.Count = montlyRule.Count;

         e.Appointment.RecurrenceRule = rrule;
     }
 }

 public class CustomMonthlyRecurrenceRule : MonthlyRecurrenceRule
 {
     public override bool MatchAdvancedPattern(DateTime date, DateTimeFormatInfo dateTimeFormat)
     {
         int monthIndex = this.Start.Value.Month - date.Month;
         DateTime calculatedNextDate = this.Start.Value.AddMonths(this.Interval);
         monthIndex = calculatedNextDate.Month - date.Month;
         if (calculatedNextDate.Year > date.Year)
         {
             return false;
         }
         if ((monthIndex % this.Interval) != 0)
         {
             return false;
         }

         if (0 != this.WeekNumber && !this.MatchWeekOfMonth(date, dateTimeFormat))
         {
             return false;
         }

         if (0 != this.DayNumber && !this.MatchDayOfMonth(date, dateTimeFormat))
         {
             return false;
         }

         if (this.WeekDays != WeekDays.None && !this.MatchDayOfWeekMask(date, dateTimeFormat.Calendar))
         {
             return false;
         }

         if (this.Offset != 0 && !this.MatchOffset(date, dateTimeFormat))
         {
             return false;
         }

         return true;
     }
 }
Unplanned
Last Updated:
11 Jul 2016 08:31
by ADMIN
ADMIN
Created by:
Dess | Tech Support Engineer, Principal
Comments:
0
Category:
Scheduler/Reminder
Type:
Bug Report
To reproduce:

RadScheduler radScheduler1 = new RadScheduler();

public Form1()
{
    InitializeComponent();
    this.Controls.Add(this.radScheduler1);
    this.radScheduler1.Dock = DockStyle.Fill;

    Timer timer = new Timer();
    timer.Interval = 1000;
    timer.Tick += timer_Tick;
    this.radScheduler1.ActiveViewType = SchedulerViewType.Timeline;
    SetupView(DateTime.Now.Date);
    timer.Start();
}

private void SetupView(DateTime currentDateTime)
{
    SchedulerTimelineView timelineView = radScheduler1.GetTimelineView();

    timelineView.RangeStartDate = currentDateTime;
    timelineView.RangeEndDate = currentDateTime.AddHours(23).AddMinutes(59).AddSeconds(59);
    timelineView.StartDate = currentDateTime;
    radScheduler1.FocusedDate = currentDateTime;
    var scale = Timescales.Hours;
    timelineView.ShowTimescale(scale);
    var currentScaling = timelineView.GetScaling();
    currentScaling.DisplayedCellsCount = 24;

    this.radScheduler1.SchedulerElement.RefreshViewElement();
}

int count = 1;
private void timer_Tick(object sender, EventArgs e)
{
    SetupView(DateTime.Now.AddDays(++count));
}

Workaround: SchedulerTimelineView .ShowNavigationElement = false;
Unplanned
Last Updated:
04 Oct 2016 08:12
by ADMIN
ADMIN
Created by:
Dess | Tech Support Engineer, Principal
Comments:
0
Category:
Scheduler/Reminder
Type:
Bug Report
To reproduce:

this.radScheduler1.ActiveViewType = SchedulerViewType.Month;
for (int i = 0; i < 10; i++)
{
    this.radScheduler1.Appointments.Add(new Appointment(DateTime.Now.AddHours(i),TimeSpan.FromMinutes(30),"A"+i));
}

Scroll to the bottom and try to select an appointment. You will notice that selection is not possible. The attached gif file illustrates the incorrect behavior.

Workaround: use the overflow button by setting the SchedulerMonthView.EnableCellOverflowButton property to true:
SchedulerMonthView monthView = this.radScheduler1.GetMonthView();
 monthView.EnableCellOverflowButton = true;
Unplanned
Last Updated:
04 Oct 2016 08:11
by ADMIN
ADMIN
Created by:
Dess | Tech Support Engineer, Principal
Comments:
0
Category:
Scheduler/Reminder
Type:
Bug Report
Please refer to the attached screenshot.

Workaround:

public Form1()
{
    InitializeComponent();

    this.radScheduler1.ElementProvider = new MyElementProvider(this.radScheduler1);
}

public class MyElementProvider : SchedulerElementProvider
{
    public MyElementProvider(RadScheduler scheduler) : base(scheduler)
    {
    }

    protected override T CreateElement<T>(SchedulerView view, object context)
    {
        if (typeof(T) == typeof(AppointmentElement))
        {
            return new CustomAppointmentElement(this.Scheduler, view, (IEvent)context)as T;
        }

        return base.CreateElement<T>(view, context);
    }
}

public class CustomAppointmentElement : AppointmentElement
{
    protected override Type ThemeEffectiveType
    {
        get
        {
            return typeof(AppointmentElement);
        }
    }

    public CustomAppointmentElement(RadScheduler scheduler,
        SchedulerView view, IEvent appointment) : base(scheduler, view, appointment)
    {
    }

    protected override SizeF ArrangeOverride(SizeF finalSize)
    {
        SizeF s = base.ArrangeOverride(finalSize);
        return new SizeF(s.Width - 5,s.Height);
    }
}
Unplanned
Last Updated:
04 Oct 2016 08:13
by ADMIN
ADMIN
Created by:
Dess | Tech Support Engineer, Principal
Comments:
0
Category:
Scheduler/Reminder
Type:
Bug Report
To reproduce:

public Form1()
{
    InitializeComponent();
    this.radScheduler1.ActiveViewType = SchedulerViewType.Week;
    SchedulerWeekView weekView = this.radScheduler1.GetWeekView();
    weekView.RangeFactor = ScaleRange.QuarterHour;

    Appointment appointment = new Appointment(DateTime.Today.AddHours(23).AddMinutes(45), new TimeSpan(0,15,0), "Meeting");
    DailyRecurrenceRule rrule = new DailyRecurrenceRule(appointment.Start, 1, 10);
    appointment.RecurrenceRule = rrule;
    this.radScheduler1.Appointments.Add(appointment);
}

Workaround: In order to deal with the border case with appointment ending at 00:00h, use a new TimeSpan(0,14,59)