1. Create a brand new project and add a ShapedForm.
2. Set the Size to 800,550.
3. Set the FormBorderStyle to FixedToolWindow.
You will notice that at run-time the size is changed to 816, 589.
Workaround:
        public ShapedForm1()
        {
            InitializeComponent();

            this.MaximumSize = new Size(800, 550);
        }
Please refer to the attached gif file for a better illustration of the steps how o reproduce the undesired behavior.
Workaround: use RadForm
How to reproduce:
private void RadForm1_Load(object sender, EventArgs e)
{
    this.radWebCam1.TakeSnapshot();
}
Workaround:
public class CustomWebCam : RadWebCam
{
    public override void TakeSnapshot()
    {
        FieldInfo fi = typeof(RadWebCam).GetField("player", BindingFlags.NonPublic | BindingFlags.Instance);
        object value = fi.GetValue(this);

        if (value == null)
        {
            return;
        }

        PropertyInfo propertyInfo = value.GetType().GetProperty("EvrVideoDisplay", BindingFlags.NonPublic | BindingFlags.Instance);
        value = propertyInfo.GetValue(value, null);

        if (value == null)
        {
            return;
        }

        base.TakeSnapshot();
    }
}
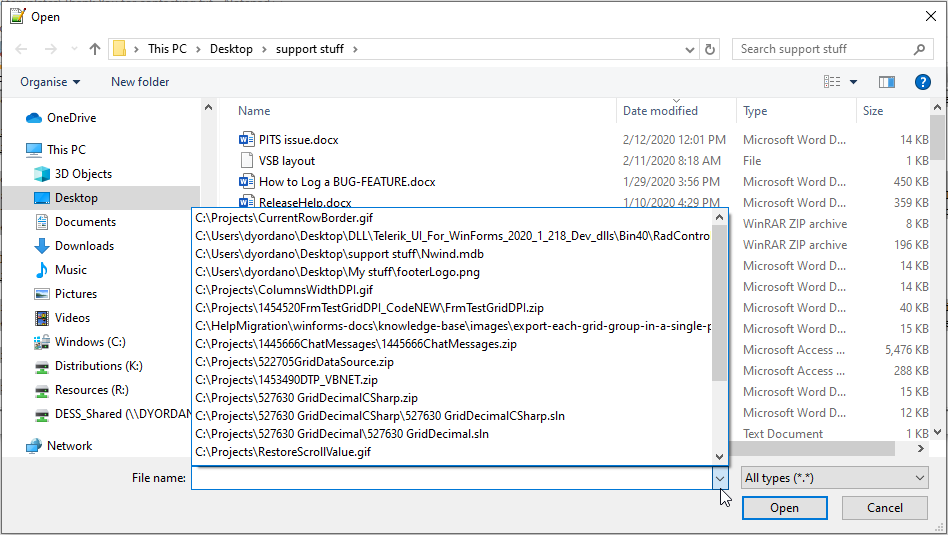
Currently, RadFileDialogs uses a RadAutoCompleteBox for specifying the folder/file name. It would be nice to have a drop down with recent files:
a:hover {
color: #3ca9f6
}
Apply the Office2010Silver theme to your application since it has a good border indication for the focus in RadSpinEditor.
Please run the attached project and click in the RadSpinEditor that is not in the RadPopupContainer. You will notice that when you move the mouse away that the border is highlighted in yellow showing that the control has complete focus. Now, click in the RadSpinEditor that is in the RadPopupContainer and move your mouse away. You will notice that the border is not highlighted in yellow indicating that it does not have focus. You can also see that it does not fire the GotFocus event. If you click closer to the border out of the "TextBox" area, the control border will stay yellow showing complete focus and fire off the GotFocus event. However, in this case, the caret is not displayed.
Workaround: handle the GotFocus/LostFocus events for the SpinElement.TextBoxItem and apply the desired border for indicating the focus.Workaround: avoid using styles with braces in their name.
Similar to RadMulticolumnComboBox but it should allow multiple items to be checked. Please refer to RadDropDownList and RadCheckedDropDownList.
https://docs.telerik.com/devtools/winforms/controls/multicolumncombobox/how-to/multiple-selection
Hi, I would like to use the conversion tool to convert a WinForms project to Telerik controls. Unfortunately the menu item is not showing up for me. See attached screenshot.
The project to be converted does include a reference to System.Windows.Forms. I am using VS2019 with the latest Telerik Winforms release.
Thanks,
-Lou
I would like to request 2 features/properties:
- Disable going back to the days on year editing end (hacked here by the SelectFirstItem() override).
- Enable inserting number of days that is currently more than the allowed days in the month by adding one month (hacked by the HandleKeyPressDay() override and MyDayLogic())
- the date set is 15.09.2019, we start writing the date 31.12.2019. Currently you have to change the months first than the days
- i guess this is a problem for formats with days first but it is a problem
public class MyMaskDateTimeProvider : MaskDateTimeProvider
{
public MyMaskDateTimeProvider(string mask, CultureInfo culture, RadMaskedEditBoxElement owner)
: base(mask, culture, owner)
{
this.AutoSelectNextPart = true;
}
public override void SelectFirstItem() { } //base.SelectFirstItem(); //we do not want to go back to the days after the year part
protected override void HandleKeyPressDay(MaskPart part, KeyPressEventArgs e)
{
if(!int.TryParse(e.KeyChar.ToString(), out int result))
return;
string str = part.value.ToString();
int num1 = 0;
int num2;
if(part.hasZero)
{
if(num1 < part.min
|| num1 > part.max)
{
num2 = result;
}
else
{
if(str.Length > 1)
str = str.Substring(1);
num2 = int.Parse(str + e.KeyChar);
}
}
else
{
if(str.Length > 1)
str = str.Substring(1);
num2 = int.Parse(str + e.KeyChar);
}
if(part.day)
{
MyDayLogic(part, num2, result);
}
else
{
part.value = num2 < part.min || num2 > part.max
? result
: num2;
}
part.hasZero = result == 0;
}
private void MyDayLogic(MaskPart part, int num2, int result)
{
//logic for not continuing when changing days and current set month has less days then days needed, when that happens add one month to the current
if((num2 < part.min)
|| (num2 > part.max))
{
if((num2 > part.min)
&& (num2 <= 31))
{
SelectNextEditableItem();
Up(this.List[this.SelectedItemIndex], this.MinDate, this.MaxDate);
SelectPrevEditableItem();
SelectNextEditableItem();
part.value = num2;
}
else
{
part.value = result;
}
}
else
{
part.value = num2;
}
}
}
Hi,
It would be cool if we had a Material Dark Theme,
More and more we see clients requesting this from our apps since Google has popularized the trend now.
Thanks