When you first load,The slots on readonly area still can be open.After selected a Appt on readonly area ,the slots onr eadonly area become disable(read only).
When you seletced a appt on left area ,the slots on right area are enable open.

The issue can be observed following this - http://demos.telerik.com/silverlight/#ScheduleView/SpecialSlots.

Available in LIB version 2016.1.201, it will be also available in the 2016 SP1 Release.
Available with LIB version 2016.3.1205, it will be also available in the 2017 R1 release.
Available in LIB version 2017.1.206 , it will be also available in the R1 2017 SP1 Release.
The direction of EditAppointmentDialog, RecurrenceChoiceDialogStyle etc. is always LeftToRight even if the ScheduleView itself is RightToLeft.
Available in LIB version: 2017.2.515
  Steps to reproduce:
  1.Open the attached solution, build and run the sample application.
    2.There are two appointments created in the view. Double click the 'Appointment2' to edit it.
    3.Select 'Room 1' from the 'Room' combo box and unselect 'Room 2'.
    4.Click OK to apply the changes.
    5.'Appointment2' is moved to 'Room 1' however it also becomes unselected as the 'Appointment1' becomes the selected one.
Hello ,
some of our users noticed that the RadScheduleView control has a weird display bug in timeline mode when
- there are a lot of resources and
- you enter timeline view after being in month view first and
- and the window is rather small.
The following screenshot shows, what the timeline should look like (I used the default Calendar template and added a few more resources and random appointments for each resource by modifying SampleContentService.cs a bit, see comments in attachment, and adding the resources in CalendarView.xaml, l.316):
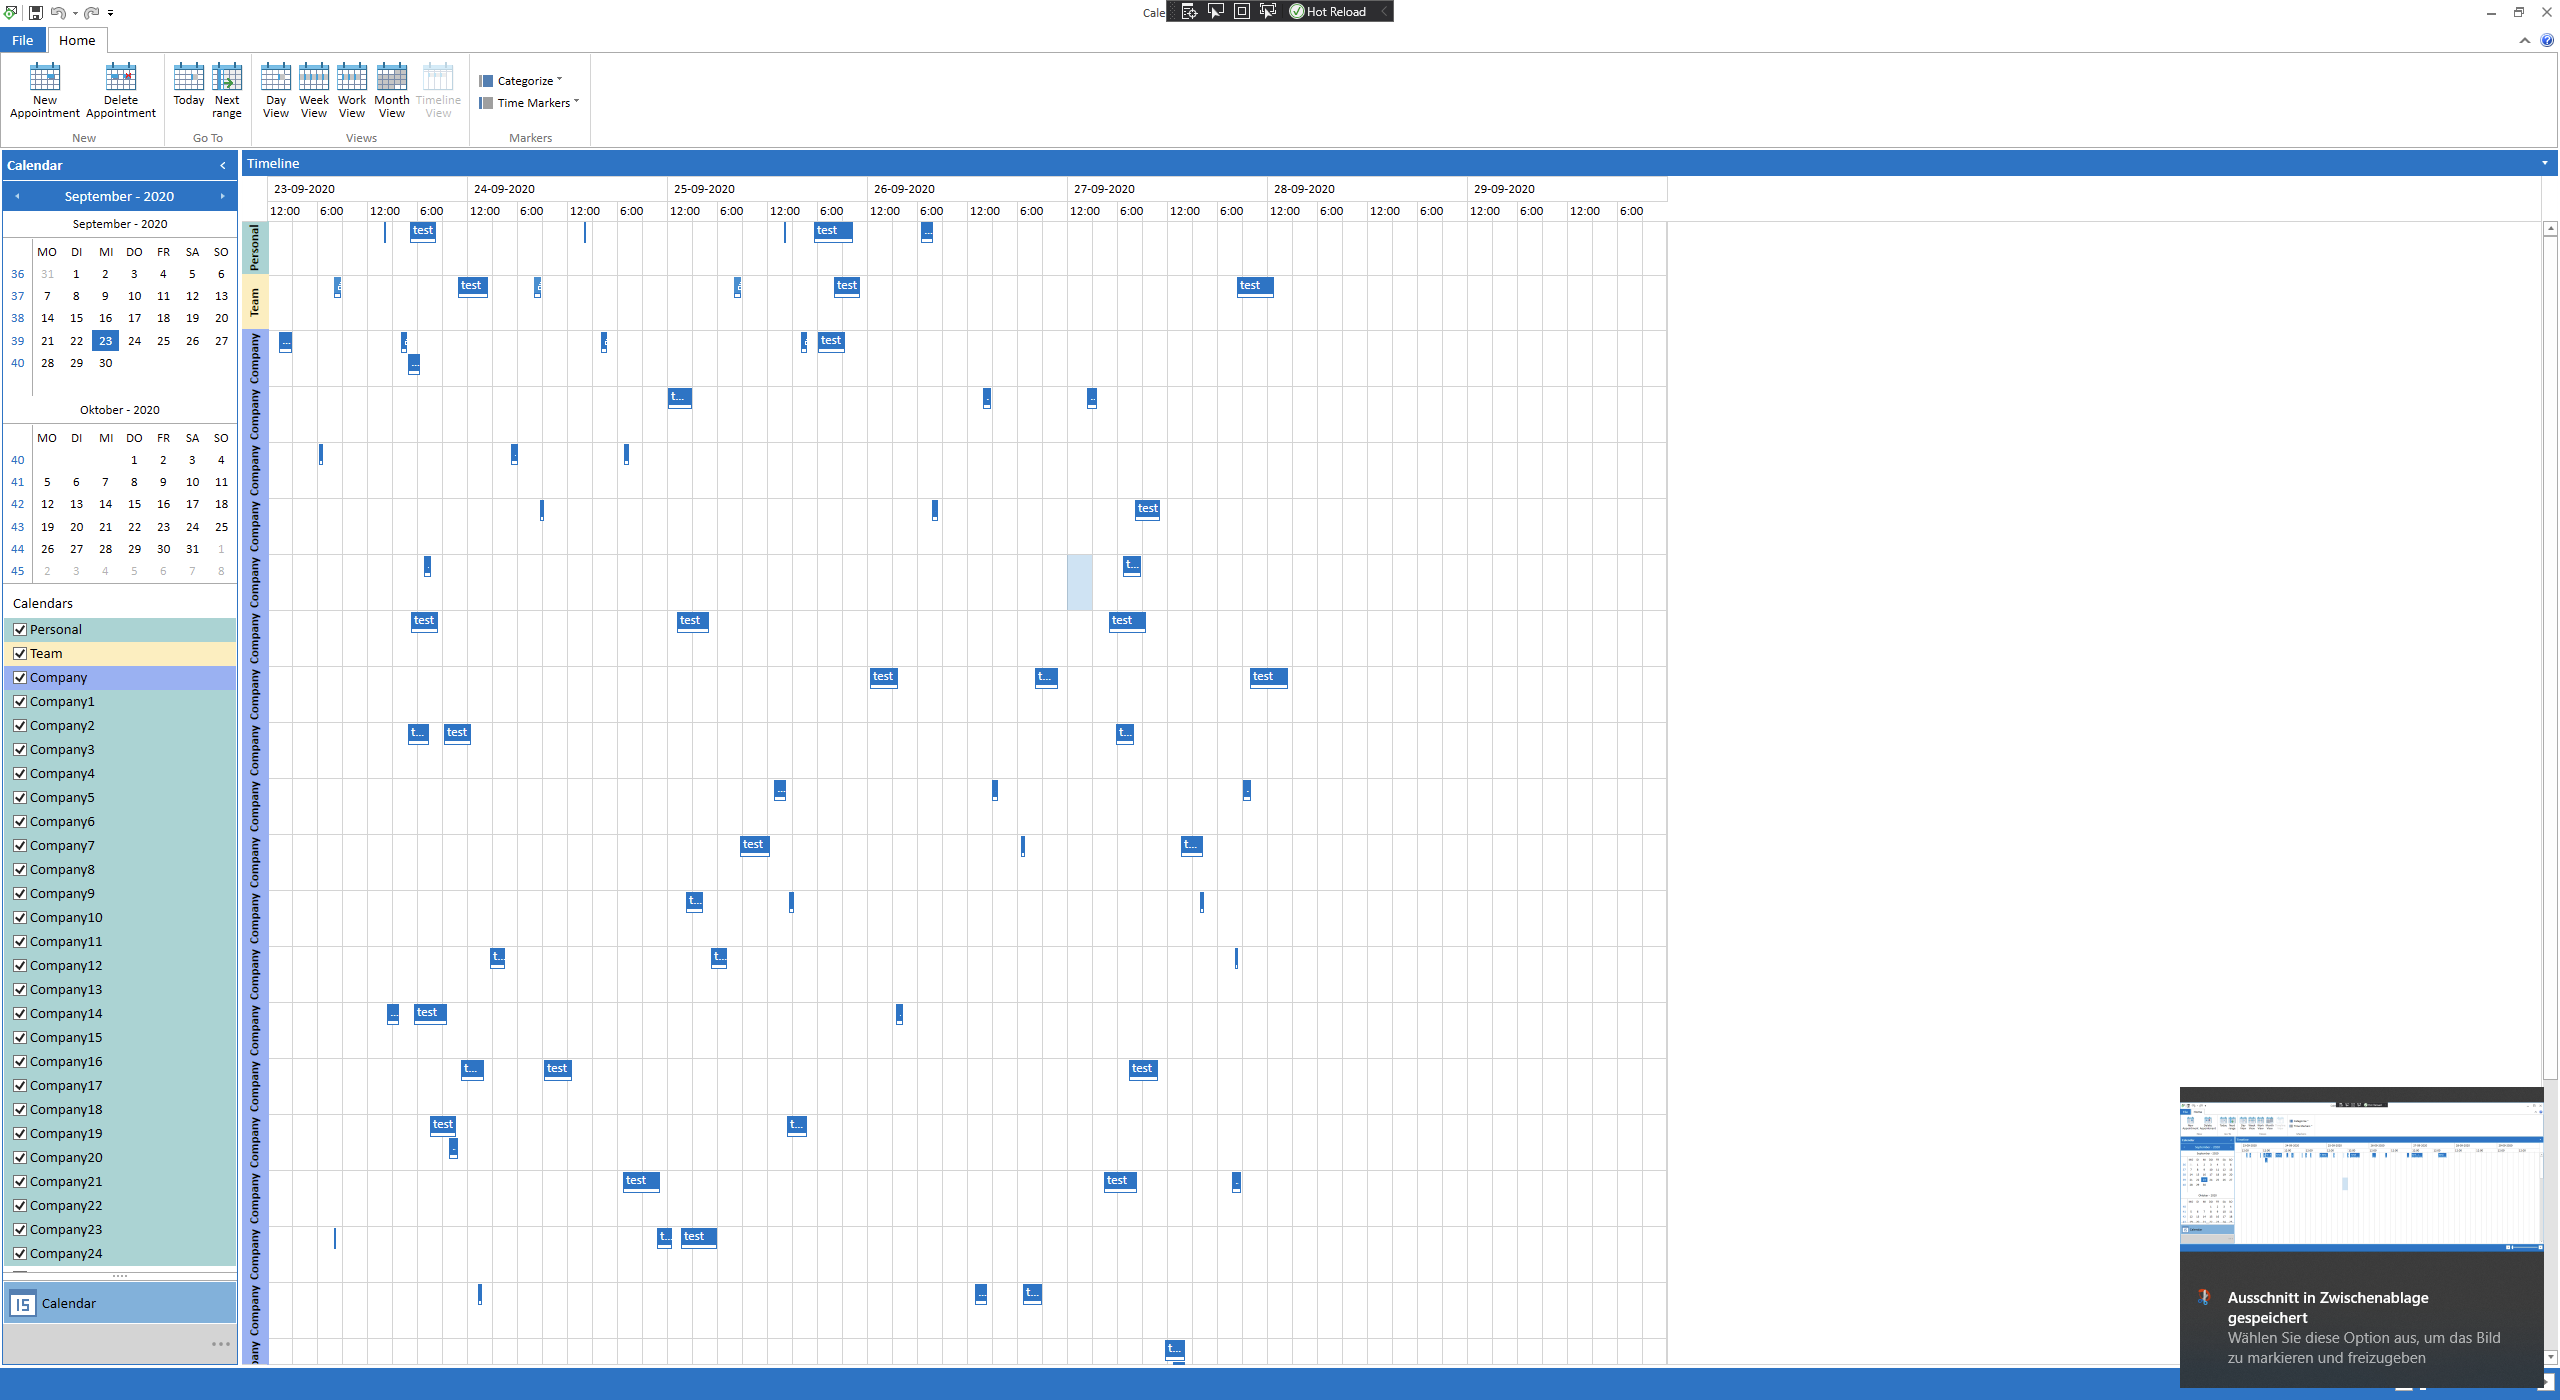
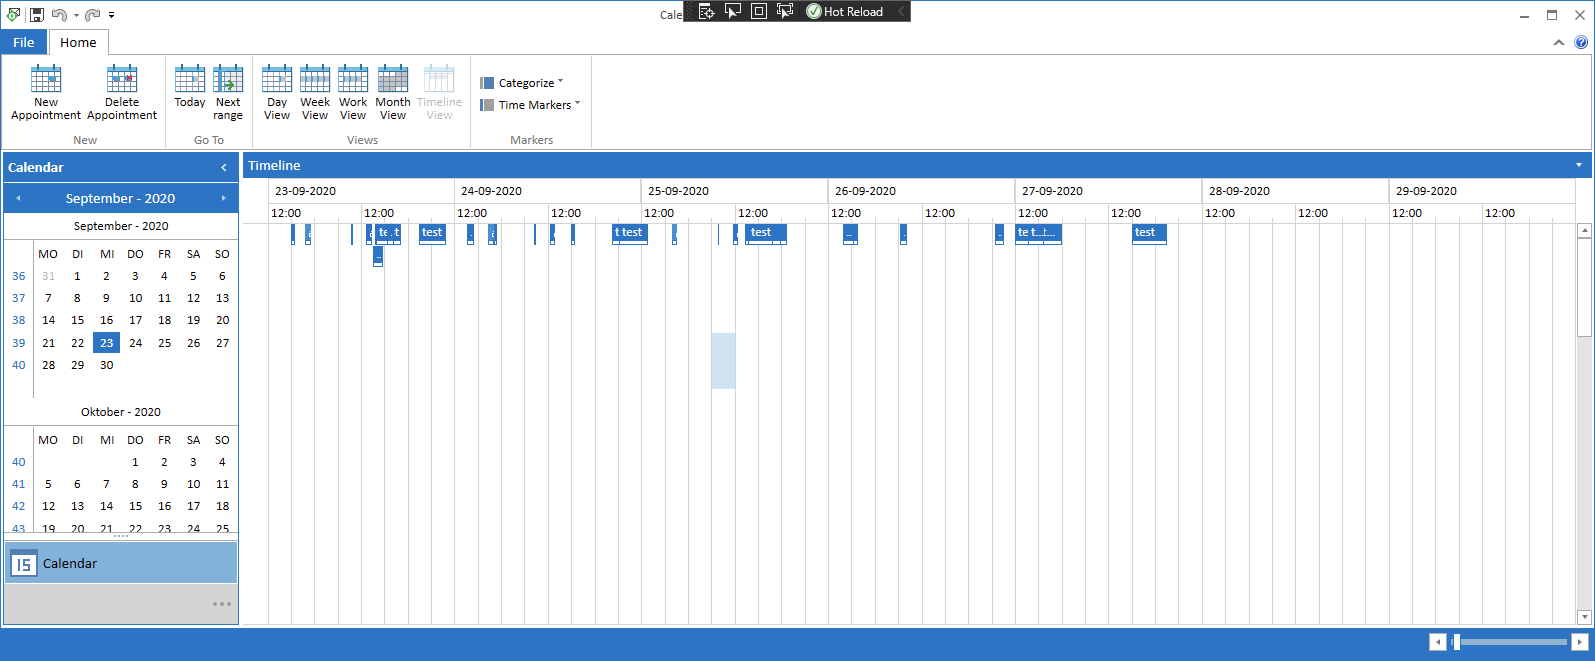
And the following Screenshot shows what the same view looks like under the previously mentioned circumstances. It seems that the resource headers are not rendered anymore and all appointments are stuck to the first row.
Steps to reproduce:
- Start the sample project from the attachment.
- Check as many checkboxes on the left side as possible
- Make the window rather small. I don't yet know exactly when the problem occurs. However, it seems to have something to do with scrolling. For me, the problem occured at a window height where around 7 resource lines would have fit into the scheduleview.
- Switch from Day View to Month View
- Switch from Month View to Timeline View
- The scheduleview should now look as in my second screenshot.
- In case it does not look like in my screenshot:
- Switch back to Day View (or any other view it seems)
- change the window size (probably make it smaller)
- Switch to month view
- Switch to Timeline View again. Rinse and repeat. Eventually, the display bug should occur pretty reliably.
Whenever this display bug occurs, any change like scrolling, resizing the window, adding an appointment restores the correct layout.
This problem seems to exist in UI for WPF 2020 R2 and R3
If I can provide you with any more information, please let me know.
Regards,
Simon Müller
Hofmann Fördertechnik GmbH
In AgendaView, you can see the start, end, and subject of each appointment. When All Day event is set to one appointment, its start and end time is not changed. The text can be changed to All Day Event.
The AppointmentItem element has a default value of Top for the VerticalContentAlignment property for the Windows 11 theme. In other themes, this property has a default value of Stretch.
To change it, create a Style with TargetType="AppointmentItem" and base it on the default AppointmentItemBaseStyle Style. On the newly created Style, set the VerticalContentAlignment property to Stretch (it is currently Top in the Windows11 theme). After that, change the default OrientedAppointmentItemStyleSelector so that each Style for its properties is based on the new Style, rather than the default one (AppointmentItemBaseStyle). Finally, set the custom OrientedAppointmentItemStyleSelector to the AppointmentStyleSelector property of RadScheduleView.
The following code snippet shows this suggestion's implementation:
xmlns:scheduleView="http://schemas.telerik.com/2008/xaml/presentation"

<Style x:Key="CustomAppointmentItemStyle" TargetType="scheduleView:AppointmentItem" BasedOn="{StaticResource AppointmentItemBaseStyle}">
    <Setter Property="VerticalContentAlignment" Value="Stretch"/>
</Style>
<scheduleView:OrientedAppointmentItemStyleSelector x:Key="CustomAppointmentItemStyleSelector">
    <scheduleView:OrientedAppointmentItemStyleSelector.AgendaViewStyle>
        <Style TargetType="scheduleView:AppointmentItem" BasedOn="{StaticResource CustomAppointmentItemStyle}">
            <Setter Property="Margin" Value="3 0 3 3"/>
        </Style>
    </scheduleView:OrientedAppointmentItemStyleSelector.AgendaViewStyle>
    <scheduleView:OrientedAppointmentItemStyleSelector.MonthViewStyle>
        <Style TargetType="scheduleView:AppointmentItem" BasedOn="{StaticResource CustomAppointmentItemStyle}">
            <Setter Property="Margin" Value="2 3 1 0"/>
        </Style>
    </scheduleView:OrientedAppointmentItemStyleSelector.MonthViewStyle>
    <scheduleView:OrientedAppointmentItemStyleSelector.HorizontalStyle>
        <Style TargetType="scheduleView:AppointmentItem" BasedOn="{StaticResource CustomAppointmentItemStyle}"/>
    </scheduleView:OrientedAppointmentItemStyleSelector.HorizontalStyle>
    <scheduleView:OrientedAppointmentItemStyleSelector.VerticalStyle>
        <Style TargetType="scheduleView:AppointmentItem" BasedOn="{StaticResource CustomAppointmentItemStyle}">
            <Setter Property="Margin" Value="1"/>
            <Setter Property="ResizeCursor" Value="SizeNS"/>
            <Setter Property="Template" Value="{StaticResource AppointmentItemVerticalControlTemplate}"/>
        </Style>
    </scheduleView:OrientedAppointmentItemStyleSelector.VerticalStyle>
</scheduleView:OrientedAppointmentItemStyleSelector>
<Style TargetType="scheduleView:RadScheduleView" BasedOn="{StaticResource RadScheduleViewStyle}">
    <Setter Property="AppointmentStyleSelector" Value="{StaticResource CustomAppointmentItemStyleSelector}"/>
</Style>
The new method should return an AppointmentItem and the developer should be able to use it in order to create a custom implementation of AppointmentItem.