Completed
Last Updated:
10 Sep 2012 02:51
by ADMIN
ADMIN
Created by:
Stefan
Comments:
0
Category:
Scheduler/Reminder
Type:
Bug Report
FIX. RadScheduler - AppointmentDeleted is fired even though the user cancelled the deletion (pressed Cancel on the dialog)
Unplanned
Last Updated:
15 Aug 2017 10:02
by ADMIN
ADMIN
Created by:
Dess | Tech Support Engineer, Principal
Comments:
0
Category:
Scheduler/Reminder
Type:
Feature Request
It would be nice if the RadScheduler allows dragging of multiple selected appointments and change the events' start time in correspondence with the active appointment offset time.
Unplanned
Last Updated:
19 Feb 2018 13:46
by ADMIN
ADMIN
Created by:
Dess | Tech Support Engineer, Principal
Comments:
4
Category:
Scheduler/Reminder
Type:
Bug Report
To reproduce:
this.radScheduler1.RightToLeft = System.Windows.Forms.RightToLeft.Yes;
this.radScheduler1.Appointments.Add(new Appointment(DateTime.Now, TimeSpan.FromHours(2), "آقای حقیقت"));

Please refer to the attached screenshot.

Workaround:

private void radScheduler1_AppointmentFormatting(object sender, SchedulerAppointmentEventArgs e)
{
    e.AppointmentElement.UseHtml = false;
}
Completed
Last Updated:
21 Oct 2016 05:42
by ADMIN
ADMIN
Created by:
Dess | Tech Support Engineer, Principal
Comments:
0
Category:
Scheduler/Reminder
Type:
Bug Report
Completed
Last Updated:
20 Oct 2016 09:30
by Ralf
ADMIN
Created by:
Dess | Tech Support Engineer, Principal
Comments:
1
Category:
Scheduler/Reminder
Type:
Bug Report
Workaround:

Sub New()

    InitializeComponent()

    Me.RadScheduler1.ActiveViewType = UI.SchedulerViewType.Week
    AddHandler Me.RadSchedulerNavigator1.SchedulerNavigatorElement.ShowWeekendCheckBox.ToggleStateChanged, AddressOf ToggleStateChanged
End Sub

Private Sub ToggleStateChanged(sender As Object, args As UI.StateChangedEventArgs)
    Me.RadScheduler1.SchedulerElement.RefreshViewElement()
End Sub
Completed
Last Updated:
14 Dec 2016 14:48
by ADMIN
ADMIN
Created by:
Dess | Tech Support Engineer, Principal
Comments:
0
Category:
Scheduler/Reminder
Type:
Feature Request
Currently, the control lacks such support and when this culture is used an exception is thrown. To reproduce use the sample project and press the navigator's Next button several times.

StackTrace:

System.ArgumentOutOfRangeException occurred

  HResult=-2146233086
  Message=Year, Month, and Day parameters describe an un-representable DateTime.
  Source=mscorlib
  StackTrace:
       at System.DateTime.DateToTicks(Int32 year, Int32 month, Int32 day)
       at Telerik.WinControls.UI.DateHelper.GetEndOfMonth(DateTime date, DateTimeFormatInfo dateTimeFormat)
       at Telerik.WinControls.UI.DateHelper.GetMonthDisplayWeeks(DateTime date, DateTimeFormatInfo dateTimeFormat)
       at Telerik.WinControls.UI.SchedulerNavigatorElement.NavigateBackwards()
       at Telerik.WinControls.UI.SchedulerNavigatorElement.OnNavigateBackwards(Object sender, EventArgs e)
       at Telerik.WinControls.UI.SchedulerNavigatorElement.NavigateButton_Click(Object sender, EventArgs e)
       at System.EventHandler.Invoke(Object sender, EventArgs e)
       at Telerik.WinControls.RadElement.OnClick(EventArgs e)
       at Telerik.WinControls.UI.RadButtonItem.OnClick(EventArgs e)
       at Telerik.WinControls.UI.RadButtonElement.OnClick(EventArgs e)
       at Telerik.WinControls.RadElement.DoClick(EventArgs e)
       at Telerik.WinControls.RadElement.RaiseBubbleEvent(RadElement sender, RoutedEventArgs args)
       at Telerik.WinControls.RadItem.RaiseBubbleEvent(RadElement sender, RoutedEventArgs args)
       at Telerik.WinControls.RadElement.RaiseRoutedEvent(RadElement sender, RoutedEventArgs args)
       at Telerik.WinControls.RadElement.RaiseBubbleEvent(RadElement sender, RoutedEventArgs args)
       at Telerik.WinControls.RadItem.RaiseBubbleEvent(RadElement sender, RoutedEventArgs args)
       at Telerik.WinControls.RadElement.RaiseRoutedEvent(RadElement sender, RoutedEventArgs args)
       at Telerik.WinControls.RadElement.DoMouseUp(MouseEventArgs e)
       at Telerik.WinControls.ComponentInputBehavior.OnMouseUp(MouseEventArgs e)
       at Telerik.WinControls.RadControl.OnMouseUp(MouseEventArgs e)
       at System.Windows.Forms.Control.WmMouseUp(Message& m, MouseButtons button, Int32 clicks)
       at System.Windows.Forms.Control.WndProc(Message& m)
       at System.Windows.Forms.ScrollableControl.WndProc(Message& m)
       at Telerik.WinControls.RadControl.WndProc(Message& m)
       at System.Windows.Forms.Control.ControlNativeWindow.OnMessage(Message& m)
       at System.Windows.Forms.Control.ControlNativeWindow.WndProc(Message& m)
       at System.Windows.Forms.NativeWindow.DebuggableCallback(IntPtr hWnd, Int32 msg, IntPtr wparam, IntPtr lparam)
       at System.Windows.Forms.UnsafeNativeMethods.DispatchMessageW(MSG& msg)
       at System.Windows.Forms.Application.ComponentManager.System.Windows.Forms.UnsafeNativeMethods.IMsoComponentManager.FPushMessageLoop(IntPtr dwComponentID, Int32 reason, Int32 pvLoopData)
       at System.Windows.Forms.Application.ThreadContext.RunMessageLoopInner(Int32 reason, ApplicationContext context)
       at System.Windows.Forms.Application.ThreadContext.RunMessageLoop(Int32 reason, ApplicationContext context)
       at System.Windows.Forms.Application.Run(Form mainForm)
       at SchedulerShamsiTest.Program.Main() in c:\Users\dyordano\Desktop\RadSchedulerFixPersianLocale (1)\SchedulerShamsiTest\Program.cs:line 19
  InnerException:
Completed
Last Updated:
20 Feb 2018 13:46
by ADMIN
ADMIN
Created by:
Dess | Tech Support Engineer, Principal
Comments:
2
Category:
Scheduler/Reminder
Type:
Bug Report
Please refer to the attached gif file and sample project.

Workaround: remove the database restrictions and validate the data in the edit dialog before submitting the new appointment data.
Unplanned
Last Updated:
20 Nov 2017 12:57
by ADMIN
ADMIN
Created by:
Dess | Tech Support Engineer, Principal
Comments:
0
Category:
Scheduler/Reminder
Type:
Feature Request
Please refer to the attached screenshot from Outlook.
Unplanned
Last Updated:
07 Nov 2017 15:21
by ADMIN
ADMIN
Created by:
Dess | Tech Support Engineer, Principal
Comments:
0
Category:
Scheduler/Reminder
Type:
Bug Report
Run the application on a Windows 10 machine and scroll to the bottom. Please refer to the attached gif file.
Completed
Last Updated:
09 Jan 2018 13:09
by ADMIN
ADMIN
Created by:
Dess | Tech Support Engineer, Principal
Comments:
0
Category:
Scheduler/Reminder
Type:
Bug Report
Completed
Last Updated:
03 Dec 2018 17:21
by Dimitar
ADMIN
Created by:
Hristo
Comments:
0
Category:
Scheduler/Reminder
Type:
Bug Report
How to reproduce: check the attached (video radscheduler-selection-incorrect.gif)
 public RadForm1()
 {
     InitializeComponent();

     Appointment appointment = new Appointment(DateTime.Today.AddHours(13), TimeSpan.FromHours(1), "Test Appointment");
     this.radScheduler1.Appointments.Add(appointment);

     for (int i = 0; i < 25; i++)
     {
         appointment = new Appointment(DateTime.Today.AddHours(24), TimeSpan.FromHours(1), "AllDay: " + i);
         appointment.AllDay = true;
         this.radScheduler1.Appointments.Add(appointment);
     }
     this.radScheduler1.AllowAppointmentsMultiSelect = true;
 }

Workaround: create a custom input behavior

this.radScheduler1.SchedulerInputBehavior = new CustomSchedulerInputBehavior(this.radScheduler1);

public class CustomSchedulerInputBehavior : SchedulerInputBehavior
{
    public CustomSchedulerInputBehavior(RadScheduler scheduler)
        : base(scheduler)
    {
    }

    public override bool HandleMouseWheel(MouseEventArgs args)
    {
        if (!this.Scheduler.AllowMouseWheelSupport)
            return false;

        bool scrolled = false;

        if (this.Scheduler.SelectionBehavior.IsAllDayAreaSelection || this.IsLastSelectedAppointmentAllDay(this.Scheduler.SelectionBehavior.SelectedAppointments))
        {
            if (this.Scheduler.GroupType == GroupType.Resource)
            {
                SchedulerDayViewGroupedByResourceElement grouped = this.Scheduler.ViewElement as SchedulerDayViewGroupedByResourceElement;
                IList<SchedulerDayViewElement> childViews = grouped != null ? grouped.GetChildViewElements() : null;
                if (childViews != null && childViews.Count > 0)
                {
                    RadScrollBarElement scroll = childViews[childViews.Count - 1].AllDayHeaderElement.ScrollBar;
                    if (scroll.Visibility != ElementVisibility.Collapsed)
                    {
                        int newValue = scroll.Value - childViews[childViews.Count - 1].AllDayHeaderElement.HeaderHeight * Math.Sign(args.Delta);
                        newValue = Math.Max(Math.Min(newValue, scroll.Maximum - scroll.LargeChange + 1), scroll.Minimum);
                        scroll.Value = newValue;
                        scrolled = true;
                    }
                }
            }
            else
            {
                SchedulerDayViewElement dayView = this.Scheduler.ViewElement as SchedulerDayViewElement;
                RadScrollBarElement scroll = dayView != null ? dayView.AllDayHeaderElement.ScrollBar : null;

                if (scroll != null && scroll.Visibility != ElementVisibility.Collapsed)
                {
                    int newValue = scroll.Value - dayView.AllDayHeaderElement.HeaderHeight * Math.Sign(args.Delta);
                    newValue = Math.Max(Math.Min(newValue, scroll.Maximum - scroll.LargeChange + 1), scroll.Minimum);
                    scroll.Value = newValue;
                    scrolled = true;
                }
            }
        }

        if (scrolled)
        {
            return false;
        }

        if (args.Delta > 0)
        {
            this.Scheduler.ViewElement.Scroll(true);
        }
        else
        {
            this.Scheduler.ViewElement.Scroll(false);
        }
        return false;
    }

    private bool IsLastSelectedAppointmentAllDay(ReadOnlyCollection<IEvent> selectedAppointments)
    {
        if (selectedAppointments.Count > 0)
        {
            return selectedAppointments[selectedAppointments.Count - 1].AllDay;
        }

        return false;
    }

}
Unplanned
Last Updated:
08 Mar 2023 10:01
by ADMIN
Created by:
Fabian
Comments:
1
Category:
Scheduler/Reminder
Type:
Bug Report
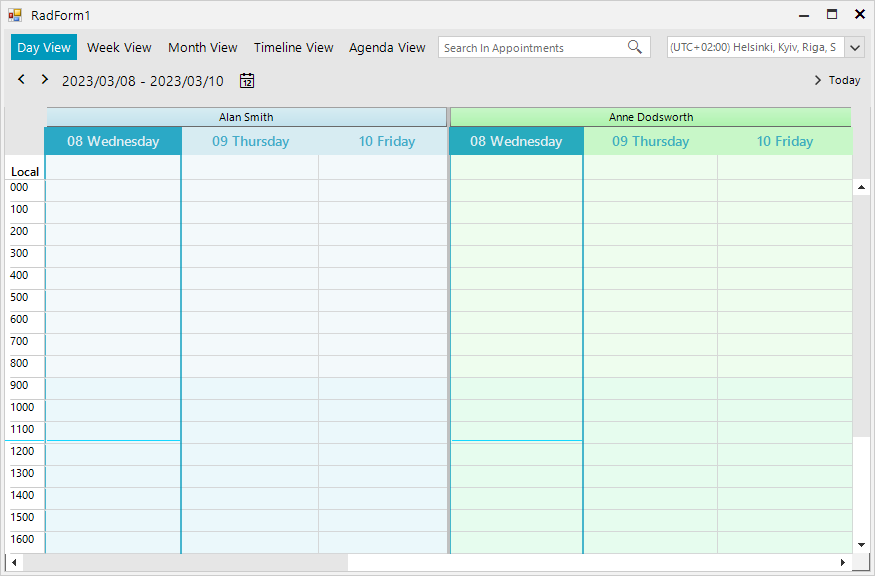
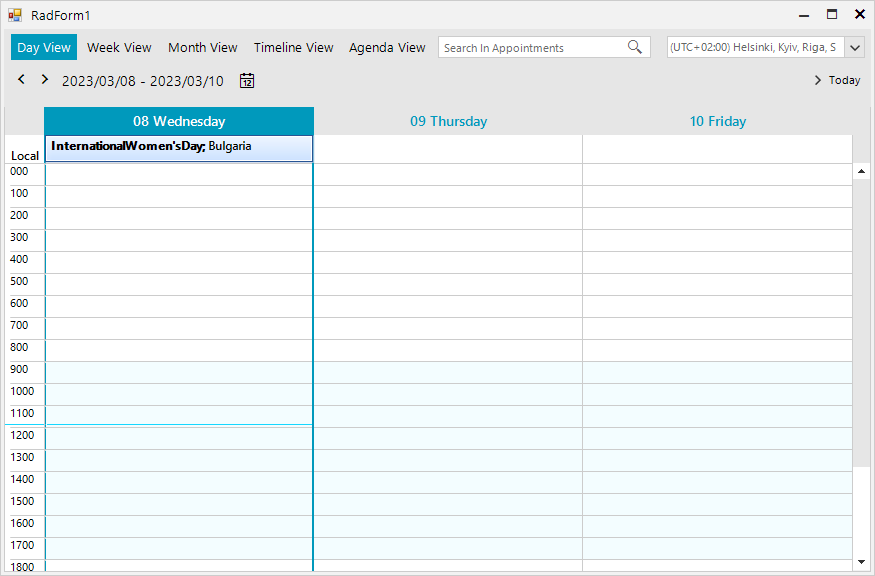
When RadScheduler is grouped by resources, the programmatically added Holidays are not displayed into the view:
    Sub New()
        InitializeComponent()

        Dim colors() As Color = {Color.LightBlue, Color.LightGreen, Color.LightYellow, Color.Red, Color.Orange, Color.Pink, Color.Purple, Color.Peru, Color.PowderBlue}
        Dim names() As String = {"Alan Smith", "Anne Dodsworth", "Boyan Mastoni", "Richard Duncan", "Maria Shnaider"}
        For i As Integer = 0 To names.Length - 1
            Dim resource As New Telerik.WinControls.UI.Resource()
            resource.Id = New EventId(i)
            resource.Name = names(i)
            resource.Color = colors(i)
            Me.RadScheduler1.Resources.Add(resource)
        Next i

        Me.RadScheduler1.GroupType = GroupType.Resource
        Me.RadScheduler1.ActiveView.ResourcesPerView = 2


        Dim holiday As Holiday = New Holiday()
        holiday.Date = New DateTime(2023, 3, 8)
        holiday.HolidayName = "International Women's Day"
        holiday.Location = "Bulgaria"
        Dim generateAppointment As Boolean = True
        Me.RadScheduler1.Holidays.AddHoliday(holiday, generateAppointment)
    End Sub
How it looks with resources:
How it looks without resources:
Completed
Last Updated:
05 Jun 2014 07:07
by ADMIN
ADMIN
Created by:
Peter
Comments:
0
Category:
Scheduler/Reminder
Type:
Bug Report
RadScheduler printing does not take in consideration the Ruler scale and always print with 30 minutes timescale.
Completed
Last Updated:
17 Jun 2014 11:09
by ADMIN
ADMIN
Created by:
Peter
Comments:
0
Category:
Scheduler/Reminder
Type:
Bug Report
The width of a resource does not always match the column(s) underneath it, resulting in the resources shifting to the left in relation to the column(s) below. It appears to be about 1 pixel difference per resource which becomes more noticeable with multiple resources .If you resize the form the resources will come close to matching the column(s) before jumping back to the full difference again. This issue can be demonstrated in the Scheduler->Grouping demo
Unplanned
Last Updated:
15 Aug 2017 09:23
by ADMIN
ADMIN
Created by:
Dobry Zranchev
Comments:
0
Category:
Scheduler/Reminder
Type:
Feature Request
Filtering should not show the appointments which have their resources not visible.
Completed
Last Updated:
08 May 2014 15:02
by ADMIN
ADMIN
Created by:
Dobry Zranchev
Comments:
0
Category:
Scheduler/Reminder
Type:
Feature Request
Add functionality to arrange appointments according their start time.
Completed
Last Updated:
10 Jun 2014 18:34
by ADMIN
ADMIN
Created by:
Dobry Zranchev
Comments:
0
Category:
Scheduler/Reminder
Type:
Feature Request
Add scroll bar to the all day area in the Day/Week/WorkWeek views
Completed
Last Updated:
05 May 2011 08:31
by ADMIN
ADMIN
Created by:
Stefan
Comments:
0
Category:
Scheduler/Reminder
Type:
Feature Request
IMPROVE. RadScheduler, add functionality to stop the InlineEditors
Completed
Last Updated:
10 Apr 2014 13:12
by ADMIN
ADMIN
Created by:
Ivan Petrov
Comments:
0
Category:
Scheduler/Reminder
Type:
Bug Report
Steps to reproduce:
1. Add a RadSchduler to a form (No need to add appointments)
2. Set the active view type to Timeline
3. Set the Appointmentheight property of the timeline view element to 50
4. Run the project, right-click on the scheduler and select Next View You will see a NullReferenceException exception.
Completed
Last Updated:
23 Feb 2013 02:36
by Jesse Dyck
ADMIN
Created by:
Ivan Petrov
Comments:
1
Category:
Scheduler/Reminder
Type:
Bug Report
Steps to reproduce:
1. Add a RadReminder component to a form
2. Set the StartNotificaton property to a TimeSpan of one hour and several minutes
3. Add a remind object to the reminder in a way that the time between now and the beginning of the appointment would be in the time interval between now and the now plus the reminder start notofication.
(e.g. this.radReminder1.StartNotification = new TimeSpan(1, 30, 0);
DateTime now = DateTime.Now;
this.radReminder1.AddRemindObject(new Appointment(now.AddMinutes(70), now.AddMinutes(90), "text"));

Start the project and show the reminder. You will see that the "Due in" time would not be correct.


