To reproduce:
ThemeResolutionService.ApplicationThemeName = "Windows11"
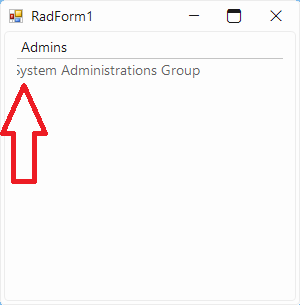
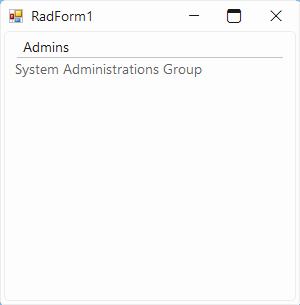
Dim UserGroup As New DescriptionTextListDataItem
With UserGroup
.Text = "Admins"
'.Font = New Font("Microsoft Sans Serif", 9.75, FontStyle.Bold)
.DescriptionText = "System Administrations Group"
End With
Me.RadListControl1.Items.Add(UserGroup)
Me.RadListControl1.ItemHeight = 50Actual result:
Expected result:
Use attached to reproduce:
- Disable and then enable the RadSateTimePicker
- You will notice that even the checkbox is unchecked the control is enabled.

Workaround:

radDateTimePicker1.Enabled =true;
if (!radDateTimePicker1.DateTimePickerElement.Checked)
{
    radDateTimePicker1.DateTimePickerElement.TextBoxElement.TextBoxItem.HostedControl.Enabled = false;
}
To reproduce:
            this.radDropDownList1.DropDownListElement.AutoCompleteMode = AutoCompleteMode.SuggestAppend;
            this.radDropDownList1.DropDownListElement.AutoCompleteAppend.LimitToList = true;
            this.radDropDownList1.DataSource = new List<string>() { "Test1", "Test2" };

Copy "Test2" and right click over the textbox. The second item is selected. However, if you press Ctrl+V instead of using the Paste option in the context menu, nothing happens.

Workaround:

    Private Sub Form1_Load(sender As Object, e As EventArgs) Handles MyBase.Load
        RadDropDownList1.DropDownListElement.AutoCompleteMode = AutoCompleteMode.SuggestAppend
        RadDropDownList1.DropDownListElement.AutoCompleteAppend.LimitToList = True
        RadDropDownList1.DataSource = {"Test1", "Test2"}

        Me.RadDropDownList1.DropDownListElement.AutoCompleteAppend = New CustomAutoCompleteAppendHelper(Me.RadDropDownList1.DropDownListElement)
    End Sub

    Public Class CustomAutoCompleteAppendHelper
    Inherits AutoCompleteAppendHelper
        Public Sub New(owner As RadDropDownListElement)
            MyBase.New(owner)

        End Sub

        Public Overrides Sub AutoComplete(e As KeyPressEventArgs)
            If Control.ModifierKeys = Keys.Control AndAlso Asc(e.KeyChar) = 22 Then
                Me.AutoComplete(e, False)
            Else
                Me.AutoComplete(e, Me.LimitToList)
            End If
        End Sub
    End Class
To reproduce:
- Add some rows to a grid.
- Sort the rows.
- Delete a row.
- The current row is not the next row.

Workaround:
Dim t As Test = RadGridView1.CurrentRow.DataBoundItem
Dim index As Integer = Me.RadGridView1.ChildRows.IndexOf(Me.RadGridView1.CurrentRow)
datasource.Remove(t)
Me.RadGridView1.CurrentRow = Me.RadGridView1.ChildRows(index)
How to reproduce: set a size in the designer, when the form loads its size will not be the same as the one set

Workaround: set the size in the Load event of the ribbon form

private void Form_Shown(object sender, EventArgs e)
{
	this.Size = new Size(600, 600);
}
To reproduce:
1. Use the following code snippet:
public class ViewModel:INotifyPropertyChanged
{
    public ViewModel()
    {
    }

    private bool _isShown;

    public bool IsShown
    {
        get
        {
            return this._isShown;
        }
        set
        {
            this._isShown = value;
            OnPropertyChanged("IsShown");
        }
    }

    public event PropertyChangedEventHandler PropertyChanged;

    protected void OnPropertyChanged(string propertyName)
    {
        PropertyChangedEventHandler handler = PropertyChanged;
        if (handler != null)
            handler(this, new PropertyChangedEventArgs(propertyName));
    }
}

2. Add a MS Panel and a RadPanel to the form.
3. Add Panel.DataBindings at design time for its Visible property to the ViewModel.IsShown property.
4. When you run the application, the MS Panel is not visible. However, if you remove the RadPanel it is shown. Please refer to the attached sample video illustrtaing better the performed steps.
Run the attached project and select a new value from the drop down for RadTimePicker:
************** Exception Text **************
System.NullReferenceException: Object reference not set to an instance of an object.
   at Telerik.WinControls.UI.RadTimePickerElement.set_Value(Object value) in C:\Work\Development\RadControls\RadControlsUI\RadTimePicker\Elements\RadTimePickerElement.cs:line 594
   at Telerik.WinControls.UI.RadTimePickerContentElement.element_Click(Object sender, EventArgs e) in C:\Work\Development\RadControls\RadControlsUI\RadTimePicker\Elements\ContentPart\RadTimePickerContentElement.cs:line 585
   at Telerik.WinControls.RadElement.OnClick(EventArgs e) in C:\Work\Development\RadControls\RadControl\TPF\Element\RadElement.cs:line 5094
   at Telerik.WinControls.RadElement.DoClick(EventArgs e) in C:\Work\Development\RadControls\RadControl\TPF\Element\RadElement.cs:line 5158
   at Telerik.WinControls.RadElement.RaiseBubbleEvent(RadElement sender, RoutedEventArgs args) in C:\Work\Development\RadControls\RadControl\TPF\Element\RadElement.cs:line 4272
   at Telerik.WinControls.RadItem.RaiseBubbleEvent(RadElement sender, RoutedEventArgs args) in C:\Work\Development\RadControls\RadControl\TPF\Element\RadItem.cs:line 779
   at Telerik.WinControls.RadElement.RaiseRoutedEvent(RadElement sender, RoutedEventArgs args) in C:\Work\Development\RadControls\RadControl\TPF\Element\RadElement.cs:line 4179
   at Telerik.WinControls.RadElement.DoMouseUp(MouseEventArgs e) in C:\Work\Development\RadControls\RadControl\TPF\Element\RadElement.cs:line 5271
   at Telerik.WinControls.RadElement.CallDoMouseUp(MouseEventArgs e) in C:\Work\Development\RadControls\RadControl\TPF\Element\RadElement.cs:line 5493
   at Telerik.WinControls.ComponentInputBehavior.OnMouseUp(MouseEventArgs e) in C:\Work\Development\RadControls\RadControl\TPF\Control\ComponentInputBehavior.cs:line 75
   at Telerik.WinControls.RadControl.OnMouseUp(MouseEventArgs e) in C:\Work\Development\RadControls\RadControl\TPF\Control\RadControl.cs:line 1206
   at System.Windows.Forms.Control.WmMouseUp(Message& m, MouseButtons button, Int32 clicks)
   at System.Windows.Forms.Control.WndProc(Message& m)
   at System.Windows.Forms.ScrollableControl.WndProc(Message& m)
   at Telerik.WinControls.RadControl.WndProc(Message& m) in C:\Work\Development\RadControls\RadControl\TPF\Control\RadControl.cs:line 1554
   at Telerik.WinControls.UI.RadPopupControlBase.WndProc(Message& m) in C:\Work\Development\RadControls\RadControlsUI\GenericPopup\RadPopupControlBase.cs:line 795
   at System.Windows.Forms.Control.ControlNativeWindow.OnMessage(Message& m)
   at System.Windows.Forms.Control.ControlNativeWindow.WndProc(Message& m)
   at System.Windows.Forms.NativeWindow.Callback(IntPtr hWnd, Int32 msg, IntPtr wparam, IntPtr lparam)
Workaround:
        Timer t = new Timer();

        private void RadTimePicker1_ValueChanged(object sender, EventArgs e)
        {
            if (radTimePicker1.Value == null) return;

            var timeval = ((DateTime)radTimePicker1.Value).TimeOfDay;

            if (timeval == TimeSpan.Zero)
            {
                t = new Timer();
                t.Interval = 500;
                t.Tick += T_Tick; t.Start();
            }
        }

        private void T_Tick(object sender, EventArgs e)
        {
            t.Stop();
            this.radTimePicker1.ValueChanged -= RadTimePicker1_ValueChanged;
            this.radTimePicker1.Value = null;
            this.radTimePicker1.ValueChanged += RadTimePicker1_ValueChanged;
        }
To reproduce:
- Add some full pages to the editor.
- Remove all margin from the print settings and document settings.
- PrintPreview the document.
- Seth the print preview dialog zoom to 100% and compare the documents.
- You will notice that the print document's content is smaller.
Please refer to the attached screenshot and sample project.

Workaround: call the RadForm.EndInit method before showing the form.
Follow the steps:
1.Group by Description.
2. Expand the groups
3. Sort by Id
4. Try expanding the hierarchical level. You will notice that some of the rows disappear.
Please refer to the attached gif file illustrating the steps for replicating the issue.
Use the code snippet:
    Sub New()

        InitializeComponent()
        Me.RadSpinEditor1.EnableNullValueInput = True
        Me.RadSpinEditor1.NullableValue = Nothing

        Console.WriteLine("Value " & Me.RadSpinEditor1.Value & " END")
        Console.WriteLine("NullableValue " & Me.RadSpinEditor1.NullableValue & " END")
    End Sub

    Private Sub RadSpinEditor1_NullableValueChanged(sender As Object, e As EventArgs) Handles RadSpinEditor1.NullableValueChanged
        Console.WriteLine("NullableValueChanged " & Me.RadSpinEditor1.NullableValue & " END")
    End Sub
Follow the steps:
1. Run the project with the above code and enter 0 in the spin editor. Navigate to the next control. You will notice that the NullableValueChanged event doesn't get fired.
2. Focus the spin editor again and enter 5. Navigate to the next control. The NullableValueChanged event is fired as expected.
3. Focus again the spin editor, select the text and press Del. Navigate to the next control. The NullableValueChanged event is fired again as expected.
4. Focus again the spin editor and enter 0. Navigate to the next control. You will notice that the NullableValueChanged event is fired.
5. Focus again the spin editor, select the text and press Del. Navigate to the next control. The NullableValueChanged event is fired again as expected.
6. Focus again the spin editor and enter 0. Navigate to the next control. You will notice that the NullableValueChanged event is NOT fired in this case.
Hi
Please find attached sample project having 2 different reference folder(Telerik2018,Telerik2020) for Telerik.
Code flow & Issue description: I have Event "radGridView1_EditorRequired" in which i have attached another event on value changed "Editor_ValueChanged" in which we get data gron DropdownListElement using ((RadDropDownListElement)(sender)).SelectedValue.
Issue is when we use version (2018.3.1016.40) we get selected value text, in case of current version (2020.1.218.40) we get null value.
Current version DLL 2020.1.218.40 (Issue in current version)
Previous version DLL 2018.3.1016.40 (Working fine)
Note : I have also attached both version of Telerik DLL in sample project, you can reproduce issue by referencing to 2020.1.218.40 version. After selecting values as shown in attached screenshot you will get null value as shown in another screenshot.
Please find attached screenshot for selecting values to reproduce issue as well where we get null value.
Thanks and Regards
Add a RadFilterView and a RadGridView. Associate the two controls and add programmatically FilterDescriptors to the RadFilterView control. The UI doesn't show any filtering applied.
        Me.RadFilterView1.FilterViewElement.LoadCategoriesAsync = False
        Me.RadGridView1.DataSource = Me.ProductsBindingSource
        Me.RadGridView1.EnableFiltering = True
        Me.RadGridView1.ShowFilteringRow = False


        AddHandler Me.RadFilterView1.FilterChanged, AddressOf Me.RadFilterView1_FilterChanged
        AddHandler Me.RadFilterView1.FilterViewElement.CategoryCreating, AddressOf Me.FilterViewElement_CategoryCreating
        AddHandler Me.RadFilterView1.FilterViewElement.CategoryCreated, AddressOf Me.FilterViewElement_CategoryCreated

        Me.RadFilterView1.AssociatedControl = Me.RadGridView1


        Dim filter As New FilterDescriptor With {
            .PropertyName = "ProductID",
            .Operator = FilterOperator.IsLessThanOrEqualTo,
            .Value = 5,
            .IsFilterEditor = True
        }

        Dim filter2 As New FilterDescriptor With {
            .PropertyName = "CategoryID",
            .Operator = FilterOperator.IsLessThanOrEqualTo,
            .Value = 4,
            .IsFilterEditor = True
        }
        Me.RadFilterView1.FilterDescriptors.AddRange(filter, filter2)
To reproduce:
- Add RadDropDownButton to a blank form.
- Set its anchor property to top, right and its AutoSize property to true.
- At runtime set the button text to a long string, you will notice that the button is resized to the right when it should be resized to the left.

To workaround this you can subscribe to the SizeChanged event of the button change its location depending on the new size:
Size prevSize;

public Form1()
{
    InitializeComponent();
    radDropDownButton1.AutoSize = true;

    this.Shown += Form1_Shown;
}

void Form1_Shown(object sender, EventArgs e)
{
    prevSize = radDropDownButton1.Size;

    radDropDownButton1.SizeChanged += radDropDownButton1_SizeChanged;
}

void radDropDownButton1_SizeChanged(object sender, EventArgs e)
{
    RadDropDownButton button = sender as RadDropDownButton;
    button.Location = new Point(button.Location.X - (radDropDownButton1.Size.Width - prevSize.Width), button.Location.Y);
    prevSize = button.Size;

}

private void radButton2_Click(object sender, EventArgs e)
{
    radDropDownButton1.Text = "Very long button text set";
}
To reproduce: please refer to the attached sample project and gif file.

Workaround: use the CellFormatting event and apply the light orange BackColor for the selected cells belonging to the current pinned column:

private void radGridView1_CellFormatting(object sender, Telerik.WinControls.UI.CellFormattingEventArgs e)
{
    if (e.Row.IsSelected && e.Column.IsCurrent)
    {
        e.CellElement.BackColor = Color.FromArgb(255, 231, 174);
    }
    else
    {
        e.CellElement.ResetValue(LightVisualElement.BackColorProperty, ValueResetFlags.Local);
    }
}
Steps to reproduce:
1. Bind the grid to BindingList
2. Call BestFitColumns method in form's constructor
3. Use Fluent/Crystal theme
4. Rebind the grid by setting DataSource=null
5. Exception is thrown
Stack trace:
en Telerik.WinControls.UI.BestFitHelper.SetColumnWidth(GridViewColumn column, Single desiredWidth)
   en Telerik.WinControls.UI.BestFitHelper.BestFitColumnCore(GridViewColumn column, BestFitColumnMode mode)
   en Telerik.WinControls.UI.BestFitHelper.ProcessRequests()
   en Telerik.WinControls.UI.GridTableElement.UpdateAll()
   en Telerik.WinControls.UI.GridTableElement.UpdateViewCore(Object sender, DataViewChangedEventArgs args)
   en Telerik.WinControls.UI.GridTableElement.UpdateView(Object sender, DataViewChangedEventArgs args)
   en Telerik.WinControls.UI.GridTableElement.ProcessTemplateEvent(GridViewEvent eventData)
   en Telerik.WinControls.UI.GridTableElement.Telerik.WinControls.UI.IGridViewEventListener.ProcessEvent(GridViewEvent eventData)
   en Telerik.WinControls.UI.GridViewEventProcessEntity.ProcessCollection(GridViewEvent gridEvent, PriorityWeakReferenceList list, GridEventProcessMode processMode)
   en Telerik.WinControls.UI.GridViewEventProcessEntity.ProcessEvent(GridViewEvent gridEvent)
   en Telerik.WinControls.UI.GridViewSynchronizationService.NotifyListeners(GridViewEvent gridEvent)
   en Telerik.WinControls.UI.GridViewSynchronizationService.FlushEvents()
   en Telerik.WinControls.UI.GridViewSynchronizationService.DispatchEvent(GridViewEvent gridEvent)
   en Telerik.WinControls.UI.GridViewSynchronizationService.DispatchEvent(GridViewTemplate template, GridViewEvent eventData, Boolean postUI)
   en Telerik.WinControls.UI.GridViewTemplate.DispatchEvent(GridViewEvent gridEvent, Boolean postUI)
   en Telerik.WinControls.UI.GridViewTemplate.DispatchDataViewChangedEvent(Object sender, DataViewChangedEventArgs args)
   en Telerik.WinControls.UI.GridViewTemplate.OnViewChanged(Object sender, DataViewChangedEventArgs e)
   en Telerik.WinControls.UI.MasterGridViewTemplate.OnViewChanged(Object sender, DataViewChangedEventArgs e)
   en Telerik.WinControls.UI.GridViewTemplate.CollectionView_CollectionChanged(Object sender, NotifyCollectionChangedEventArgs e)
   en Telerik.WinControls.Data.RadCollectionView`1.OnCollectionChanged(NotifyCollectionChangedEventArgs args)
   en Telerik.WinControls.Data.RadDataView`1.RebuildData(Boolean notify)
   en Telerik.WinControls.Data.RadDataView`1.RefreshOverride()
   en Telerik.WinControls.Data.RadDataView`1.ProcessCollectionChanged(NotifyCollectionChangedEventArgs args)
   en Telerik.WinControls.Data.RadCollectionView`1.source_CollectionChanged(Object sender, NotifyCollectionChangedEventArgs e)
   en Telerik.WinControls.Data.NotifyCollectionChangedEventHandler.Invoke(Object sender, NotifyCollectionChangedEventArgs e)
   en Telerik.WinControls.Data.RadListSource`1.OnCollectionChanged(NotifyCollectionChangedEventArgs e)
   en Telerik.WinControls.Data.RadListSource`1.EndUpdate(Boolean notifyUpdates)
   en Telerik.WinControls.Data.RadListSource`1.Initialize()
   en Telerik.WinControls.Data.RadListSource`1.Bind(Object dataSource, String dataMember)
   en Telerik.WinControls.Data.RadListSource`1.set_DataSource(Object value)
   en Telerik.WinControls.UI.GridViewTemplate.set_DataSource(Object value)
   en Telerik.WinControls.UI.RadGridView.set_DataSource(Object value)
Repro-steps:
- Create a RadGridView
- MultiSelect = true
- SelectionMode = CellSelect
- Fill it with lots of cells (in my case: 7 columns, 8544 rows)
- Press CTRL-A
- Press Delete
Expected behavior:
- All rows are gone
Observed behavior:
- 50/50 change that some rows remain.
I traced the problem back to the method GridViewSleectedCellsCollection.IsSelected / GetHashCodeString.
internal bool IsSelected(GridViewRowInfo row, GridViewColumn column) => row != null && column is GridViewDataColumn && this.hashtable.Contains((object) this.GetHashCodeString(row, column));When a cell is selected with GridViewCellInfo.IsSelected = true, it checks if it has already been selected. It does so by calling GridViewSleectedCellsCollection.IsSelected. which checks if a HasCodeString is already in a hashtable. But, when another selected cell has the same HasCodeString, the result is (incorrectly) true, which will result in not added it to the collection of selected cells.
I guess that is can be easily fixed by changing:
 private string GetHashCodeString(GridViewRowInfo row, GridViewColumn column)
    {
      int hashCode = row.GetHashCode();
      string str1 = hashCode.ToString();
      hashCode = column.GetHashCode();
      string str2 = hashCode.ToString();
      return str1 + str2;
    }
to:
 private string GetHashCodeString(GridViewRowInfo row, GridViewColumn column)
    {
      int hashCode = row.GetHashCode();
      string str1 = hashCode.ToString();
      hashCode = column.GetHashCode();
      string str2 = hashCode.ToString();
      return str1 + "_" + str2;
    }
Since hashcodes 1 + 23 will result in the same string as hashcodes 12 + 3.
Making this change will reduce the problem significantly, but not entirely since hashCodes will never be unique.